kdump 在Debian/Fedora/CentOS下的配置

November 1st, 2014 by JasonLe's Tech 3,935 views

Update 2014/11/6

0.why we use kdump?

Kdump is a kernel crash dumping mechanism and is very reliable because the crash dump is captured from the context of a freshly booted kernel and not from the context of the crashed kernel. Kdump uses kexec to boot into a second kernel whenever system crashes. This second kernel, often called the crash kernel, boots with very little memory and captures the dump image.

The first kernel reserves a section of memory that the second kernel uses to boot. Kexec enables booting the capture kernel without going through the BIOS, so contents of the first kernel’s memory are preserved, which is essentially the kernel crash dump.
使用mce-inject注入fatal错误的时候,system会直接panic。不像UCNA,SRAO等可以通过mcelog,rasDamon查看。
system在进去machine check 后,内核调用,用户态下的mcelog,rasDamon都已经无法使用,导致dmesg信息MCE解码信息都无法查看。

kdump原理就是在dump kernel panic后,重新启动后利用kexec载入debug kernel 然后利用这个内核去dump出现panic错误的内核信息。

然后system使用正常kernel启动后,可以分析该dump文件,包括查看demsg/memory/PCIe等各种kernel信息等。
用来诊断kernel出现了哪些致命错误。
在本项目中主要利用该工具用来分析注入mce 错误产生的dumpcore信息。
————————————————————————–

首先我们分清要使用的系统:

1.Fedora Configure

由于Fedora的软件比较新,如果你用的是是Fedora 20

我们直接可以 yum install –enablerepo=fedora-debuginfo –enablerepo=updates-debuginfo kexec-tools crash kernel-debuginfo
下载安装好kdump crash kexec工具

2.然后我们在/etc/default/grub里面的

GRUB_CMDLINE_LINUX=”rd.lvm.lv=fedora/swap rd.md=0 rd.dm=0 $([ -x /usr/sbin/rhcrashkernel-param ] && /usr/sbin/rhcrashkerne l-param || 🙂 rd.luks=0 vconsole.keymap=us rd.lvm.lv=fedora/root rhgb quiet crashkernel=240M”
最后加入crashkernel=240M

这个预先留出的内存大小,在下次使用就被占用。
一般 1G——80M 2G——-160M 3G——–240M

最后更新grub :$grub2-mkconfig -o /boot/grub2/grub.cfg 即可

3.重新启动,选择该内核进入system

[root@localhost mce-inject-encode]# service kdump start
Redirecting to /bin/systemctl start kdump.service
[root@localhost mce-inject-encode]# systemctl status kdump
kdump.service - Crash recovery kernel arming
Loaded: loaded (/usr/lib/systemd/system/kdump.service; enabled)
Active: active (exited) since 一 2014-10-27 09:15:31 CST; 2 days ago
Process: 652 ExecStart=/usr/bin/kdumpctl start (code=exited, status=0/SUCCESS)
Main PID: 652 (code=exited, status=0/SUCCESS)
CGroup: /system.slice/kdump.service

10月 27 09:15:22 localhost.localdomain systemd[1]: Starting Crash recovery kernel arming...
10月 27 09:15:31 localhost.localdomain kdumpctl[652]: kexec: loaded kdump kernel
10月 27 09:15:31 localhost.localdomain kdumpctl[652]: Starting kdump: [OK]
10月 27 09:15:31 localhost.localdomain systemd[1]: Started Crash recovery kernel arming.
10月 29 09:29:36 localhost.localdomain systemd[1]: Started Crash recovery kernel arming.

4.开始等待panic错误,如果发现panic错误,system会立刻切换到crashkernel收集信息,收集完毕重新启动。

5.进入到system。键入到/var/crash文件夹下有通过kdump产生的文件:

[root@localhost 127.0.0.1-2014.10.29-09:59:07]# ls
vmcore vmcore-dmesg.txt
[root@localhost 127.0.0.1-2014.10.29-09:59:07]# vim vmcore-dmesg.txt

[175451.136453] Triggering MCE exception on CPU 0
[175451.136463] [Hardware Error]: MC0 Error:
[175451.136467] [Hardware Error]: Corrupted MC0 MCE info?
[175451.136469] [Hardware Error]: Error Status: System Fatal error.
[175451.136472] [Hardware Error]: CPU:0 (f:6b:2) MC0_STATUS[-|UE|-|PCC|-]: 0xb200000000000000
[175451.136475] [Hardware Error]: cache level: RESV, tx: INSN
[175451.136480] mce: [Hardware Error]: CPU 0: Machine Check Exception: 0 Bank 0: b200000000000000
[175451.136662] mce: [Hardware Error]: TSC 15f2d1714af92
[175451.136765] mce: [Hardware Error]: PROCESSOR 2:60fb2 TIME 1414547938 SOCKET 0 APIC 0 microcode 0
[175451.136933] [Hardware Error]: MC0 Error:
[175451.137020] [Hardware Error]: Corrupted MC0 MCE info?
[175451.137132] [Hardware Error]: Error Status: System Fatal error.
[175451.137249] [Hardware Error]: CPU:0 (f:6b:2) MC0_STATUS[-|UE|-|PCC|-]: 0xb200000000000000
[175451.137412] [Hardware Error]: cache level: RESV, tx: INSN
[175451.137431] mce: [Hardware Error]: Machine check: Invalid
[175451.137431] Kernel panic - not syncing: Fatal machine check on current CPU

通过vmcore-dmesg.txt 可以查看panic时的dmesg 。如果需要对panic core 进行debug的时候,需要
使用[root@localhost 127.0.0.1-2014.10.29-09:59:07]# crash vmcore /usr/lib/debug/lib/xxxxxx/vmlinux

PS:注意这个vmcore与你的debugcore 版本要一致否则无法进行crash!

创建kernel-debuginfo-devel
https://fedoraproject.org/wiki/Building_a_custom_kernel
https://fedoraproject.org/wiki/How_to_create_an_RPM_package/zh-cn
http://blog.csdn.net/justlinux2010/article/details/9905425
http://www.linuxfly.org/post/130/

具体操作看http://www.lizhaozhong.info/archives/1143

——————————————————————————————————

CentOS 7 Configure

CentOS 7 与 Fedora很类似,这个发行版在程序安装的时候就提供了kdump配置,为了我们手动安装,我们先手动关闭。

CentOS 7 与 Fedora操作类似,都是使用yum机制安装程序。在本项目中,我制作了kernel-3.14.8.rpm包,方便后期注入使用。

CentOS 7 使用了systemctl管理系统service ,当我们安装完成3.14.8 内核,与kdump-tools等工具链。
配置文件放在/etc/sysconfig/kdump中

当然我们要在/etc/default/grub中定义crashkernel的大小,重启以后,使用systemctl enable kdump.service 设置为开机启动。
systemctl start kdump.service 启动kdump.service 服务。
systemctl status kdump.service 可以查看该服务状态:

[root@localhost sysconfig]# systemctl status kdump.service -l
kdump.service - Crash recovery kernel arming
Loaded: loaded (/usr/lib/systemd/system/kdump.service; enabled)
Active: active (exited) since 一 2014-12-22 09:10:30 EST; 1 day 11h ago
Process: 809 ExecStart=/usr/bin/kdumpctl start (code=exited, status=0/SUCCESS)
Main PID: 809 (code=exited, status=0/SUCCESS)
CGroup: /system.slice/kdump.service

12月 22 09:10:27 localhost.localdomain kdumpctl[809]: cat: /sys/kernel/security/securelevel: No such file or directory
12月 22 09:10:30 localhost.localdomain kdumpctl[809]: kexec: loaded kdump kernel
12月 22 09:10:30 localhost.localdomain kdumpctl[809]: Starting kdump: [OK]
12月 22 09:10:30 localhost.localdomain systemd[1]: Started Crash recovery kernel arming.

当遇到panic事件后,kdump会转储故障内核,重新启动后,我们以可以在/var/crash下找到vmcore

具体加载vmcore方式是使用
[root@localhost 127.0.0.1-2014.12.22-09:09:51]# crash vmcore /boot/vmlinux-3.14.8.bz2

/boot/vmlinux-3.14.8.bz2 是我们自己打包的rpm包,带有debug symbol 的 镜像,可以用于debug vmcore

————————————
Debian Configure

因为在本项目中我们使用kernel 3.14.8,所以我们要使用crash 7.0.8.在Deibian 7.6中,默认的crash 6.0.6版本中
无法分析kernel 3.6以及以后内核的SLAB内存,crash载入dump文件,会出现以下错误信息:

please wait... (gathering kmem slab cache data)
crash: invalid structure member offset: kmem_cache_s_next
FILE: memory.c LINE: 7903 FUNCTION: kmem_cache_init()
[/usr/bin/crash] error trace: 466a99 => 47b44b => 491f5c => 547d43
547d43: OFFSET_verify+164
491f5c: (undetermined)
47b44b: vm_init+10841
466a99: main_loop+239

一个方法是我们可以在/etc/apt/source.list 中将wheezy改为jessie,可以顺利将crash升级到7.0.8

Debian Configure 有一个问题是需要手动配置crashkernel 内核地址

1. aptitude install kdump-tools crash kexec-tools makedumpfile

2.在 /etc/default/grub中修改为GRUB_CMDLINE_LINUX_DEFAULT=”crashkernel=128M quiet”

3.# update-grub2
4.里面的DEBUG_KERNEL也要对应产生的vmcore版本,进行crash时vmcore与这个debug_kernel must版本一致!

主要是在编译内核的目录下使用make deb-pkg 这时会产生专门针对3.14.8内核的dbg vmlinux,以及header

root@debian:/usr/src/kernels# ls
linux-3.14.8 linux-headers-3.14.8_3.14.8-2_amd64.deb linux-libc-dev_3.14.8-2_amd64.deb
linux-3.14.8.tar linux-image-3.14.8_3.14.8-2_amd64.deb
linux-firmware-image-3.14.8_3.14.8-2_amd64.deb linux-image-3.14.8-dbg_3.14.8-2_amd64.deb

然后安装这些生成的deb.
5.在/etc/default/kdump-tools中配置为

USE_KDUMP=1
KDUMP_SYSCTL="kernel.panic_on_oops=1"
KDUMP_KERNEL=/boot/vmlinuz-3.14.8
KDUMP_INITRD=/boot/initrd.img-3.14.8
KDUMP_COREDIR="/var/crash"
KDUMP_FAIL_CMD="reboot -f"
DEBUG_KERNEL=/usr/lib/debug/boot/vmlinux-3.14.8
MAKEDUMP_ARGS="-c -d 31"

//在/etc/default/kexec中配置为:
root@debian:/usr/src/kernels# cat /etc/default/kexec
# Defaults for kexec initscript
# sourced by /etc/init.d/kexec and /etc/init.d/kexec-load

# Load a kexec kernel (true/false)
LOAD_KEXEC=true

# Kernel and initrd image
KERNEL_IMAGE="/boot/vmlinuz-3.14.8"
INITRD="/boot/initrd.img-3.14.8"

# If empty, use current /proc/cmdline
APPEND=""

# Load the default kernel from grub config (true/false)
USE_GRUB_CONFIG=false

6.重新启动:

root@debian:/usr/src/kernels# service kdump-tools restart
[ ok ] unloaded kdump kernel.
[ ok ] loaded kdump kernel.

7.kdump就开始捕捉错误。

8.关于分析dump的操作crash

This GDB was configured as "x86_64-unknown-linux-gnu"...

      KERNEL: kernel_link
    DUMPFILE: dump.201410311601  [PARTIAL DUMP]
        CPUS: 2
        DATE: Fri Oct 31 16:01:04 2014
      UPTIME: 00:09:57
LOAD AVERAGE: 0.21, 0.11, 0.07
       TASKS: 209
    NODENAME: debian
     RELEASE: 3.14.8
     VERSION: #2 SMP Fri Oct 31 14:38:20 CST 2014
     MACHINE: x86_64  (2199 Mhz)
      MEMORY: 1.7 GB
       PANIC: "Kernel panic - not syncing: Fatal machine check on current CPU"
         PID: 0
     COMMAND: "swapper/1"
        TASK: ffff88006d7ea8e0  (1 of 2)  [THREAD_INFO: ffff88006d7ee000]
         CPU: 1
       STATE: TASK_RUNNING (PANIC)

crash> help

*              files          mach           repeat         timer
alias          foreach        mod            runq           tree
ascii          fuser          mount          search         union
bt             gdb            net            set            vm
btop           help           p              sig            vtop
dev            ipcs           ps             struct         waitq
dis            irq            pte            swap           whatis
eval           kmem           ptob           sym            wr
exit           list           ptov           sys            q
extend         log            rd             task           

crash version: 7.0.8    gdb version: 7.6
For help on any command above, enter "help <command>".
For help on input options, enter "help input".
For help on output options, enter "help output".

crash>

参考:

http://wiki.incloudus.com/display/DOC/Debian+-+Kdump
http://fedoraproject.org/wiki/How_to_use_kdump_to_debug_kernel_crashes
http://debian-handbook.info/browse/stable/sect.kernel-compilation.html
C/S模型下Server 中fork()的健壮性

October 30th, 2014 by JasonLe's Tech 1,721 views

C/S模型下Server 下编程非常依赖fork()子进程去处理具体的业务逻辑。 每当accept()接收到一个TCP连接时,主服务器进程就fork一个子服务器进程。子服务器进程调用相应的函数,通过client_fd(连接套接字)对客户端发来的网络请求进程处理;由于客户端的请求已被子服务进程处理,那么主服务器进程就什么也不做,通过sockfd(监听套接字)继续循环等待新的网络请求。

..........
while (1) {
	sin_size = sizeof(struct sockaddr_in);
	if ((client_fd = accept(sockfd, (struct sockaddr *)&remote_addr, &sin_size)) == -1) {
		my_error("accept", errno, __LINE__);
		continue;
	}

	if ((pid = fork()) == 0) {
		close(sockfd);
		process_client_request(client_fd);
		close(client_fd);
		exit(0);
	} else if (pid > 0)
		close(client_fd);
	else
		my_error("fork", errno, __LINE__);
}

每个文件都有一个引用计数,该引用计数表示当前系统内的所有进程打开该文件描述符的个数。套接字是一种特殊的文件,当然也有引用计数。 当fork执行后,由于子进程复制了父进程的资源,所以子进程也拥有这两个套接字描述符,则此时sockfd和client_fd的引用计数都为2。只有当子进程处理完客户请求时,client_fd的引用计数才由于close函数而变为0。 但是这里存在一个严重的问题:如果客户端意外退出,就会导致server子进程成为僵尸进程。我们设想如果server非常繁忙,就会导致system出现大量的zombie进程!system会应该耗尽系统资源而宕机! 这是因为

当一个子进程先于父进程结束运行时,它与其父进程之间的关联还会保持到父进程也正常地结束运行,或者父进程调用了wait才告终止。

子进程退出时,内核将子进程置为僵尸状态,它只保留最小的一些内核数据结构,以便父进程查询子进程的退出状态。

进程表中代表子进程的数据项是不会立刻释放的,虽然不再活跃了,可子进程还停留在系统里,因为它的退出码还需要保存起来以备父进程中后续的wait调用使用。

所以我们要处理zombie进程! 两种方式:

  • 调用wait或者waitpid函数查询子进程退出状态,此方法父进程会被挂起。
  • 如果不想让父进程挂起,可以在父进程中加入一条语句:signal(SIGCHLD,SIG_IGN);表示父进程忽略SIGCHLD信号,该信号是子进程退出的时候向父进程发送的。

当子进程终止时会给父进程发送SIGCHLD信号,因此我们可以利用信号处理函数捕获这个信号并对僵死进程进行处理。我们知道在父进程中调用wait函数可以防止先于父进程终止的子进程编程僵死进程

void sig_zchild(int signo)
{
	pid_t pid;
	int stat;

	pid = wait(&stat);
        printf("child %d terminated\n", pid);
	return;
}

修改服务器程序,在accept函数调用之前调用signal函数:

	if(listen(sockfd, BACKLOG) == -1) {

		printf("listen error!\n");
		exit(1);
	}

	if (signal(SIGCHLD, sig_zchild) == SIG_ERR) {
		printf("signal error!\n");
		exit(1);
	}

	while (1) {

		sin_size = sizeof(struct sockaddr_in);
		if ((client_fd = accept(sockfd, (struct sockaddr *)&remote_addr,
&sin_size)) == -1) {

			printf("accept error!\n");
			continue;
		}
		…… ……
	}//while

但是这个程序仍存在一个问题:当多个子进程同时退出时,会导致父进程无法同时处理SIGCHILD信号,导致有部分子进程zombie。

void sig_zchild(int signo)
{
 pid_t pid;
 int stat;

 while ((pid = waitpid(-1, &stat, WNOHANG)) > 0)
 printf("child %d terminated\n", pid);

 return;
}

使用while可以等待SIGCHILD信号,直到处理完成! 信号在内核中也是存放在队列中!


参考:http://www.cnblogs.com/mickole/p/3187770.html

VFS Data Structure关系(3) – 跨文件系统的文件操作分析

October 28th, 2014 by JasonLe's Tech 1,756 views

通过对VFS 以及文件系统的分析,我们现在来分析一下跨文件系统的文件传输

http://www.lizhaozhong.info/archives/1080

http://www.lizhaozhong.info/archives/1110

比如从一个floppy传输到harddisk(ext2——>ext4)

首先我们明确一个概念:一切皆文件!

在linux中,无论是普通的文件,还是特殊的目录、设备等,VFS都将它们同等看待成文件,通过统一的文件操作界面来对它们进行操作。操作文件时需先打开;打开文件时,VFS会知道该文件对应的文件系统格式;当VFS把控制权传给实际的文件系统时,实际的文件系统再做出具体区分,对不同的文件类型执行不同的操作。

原理:将ext2格式的磁盘上的一个文件a.txt拷贝到ext4格式的磁盘上,命名为b.txt。这包含两个过程,对a.txt进行读操作,对b.txt进行写操作。读写操作前,需要先打开文件。由前面的分析可知,打开文件时,VFS会知道该文件对应的文件系统格式,以后操作该文件时,VFS会调用其对应的实际文件系统的操作方法。所以,VFS调用vfat的读文件方法将a.txt的数据读入内存;在将a.txt在内存中的数据映射mmap()到b.txt对应的内存空间后,VFS调用ext4的写文件方法将b.txt写入磁盘;从而实现了最终的跨文件系统的复制操作。

关于mmap()使用

fs/open.c

long do_sys_open(int dfd, const char __user *filename, int flags, umode_t mode)
{
    struct open_flags op;
    int fd = build_open_flags(flags, mode, &op);
    struct filename *tmp;

    if (fd)
        return fd;

    tmp = getname(filename);
    if (IS_ERR(tmp))
        return PTR_ERR(tmp);

    fd = get_unused_fd_flags(flags);
    if (fd >= 0) {
        struct file *f = do_filp_open(dfd, tmp, &op);
        if (IS_ERR(f)) {
            put_unused_fd(fd);
            fd = PTR_ERR(f);
        } else {
            fsnotify_open(f);
            fd_install(fd, f);
        }
    }
    putname(tmp);
    return fd;
}

下面我们来分析下linux-3.14.8的内核(Not Finished!)

sys_open()
    |
    |------do_sys_open()
    |           |
    |           |------get_unused_fd_flags()
                |
                |------do_filp_open()
                            |
                            |----path_openat()
                            |       |
                            |       |----link_path_walk()

VFS Data Structure关系(2)

October 27th, 2014 by JasonLe's Tech 1,985 views

之前分析了文件系统主要的数据结构inode,dentry,super_block,file.

为了加快文件的一些操作,还引入了中间的数据结构。

struct file_system_type(include/linux/fs.h)

file_system_type结构用来描述具体的文件系统的类型信息。被Linux支持的文件系统,都有且仅有一 个file_system_type结构而不管它有零个或多个实例被安装到系统中。

struct file_system_type {
    const char *name;
    int fs_flags;
#define FS_REQUIRES_DEV     1
#define FS_BINARY_MOUNTDATA 2
#define FS_HAS_SUBTYPE      4
#define FS_USERNS_MOUNT     8   /* Can be mounted by userns root */
#define FS_USERNS_DEV_MOUNT 16 /* A userns mount does not imply MNT_NODEV */
#define FS_RENAME_DOES_D_MOVE   32768   /* FS will handle d_move() during rename() internally. */
    struct dentry *(*mount) (struct file_system_type *, int,
               const char *, void *);
    void (*kill_sb) (struct super_block *);
    struct module *owner;
    struct file_system_type * next;
    struct hlist_head fs_supers;

    struct lock_class_key s_lock_key;
    struct lock_class_key s_umount_key;
    struct lock_class_key s_vfs_rename_key;
    struct lock_class_key s_writers_key[SB_FREEZE_LEVELS];

    struct lock_class_key i_lock_key;
    struct lock_class_key i_mutex_key;
    struct lock_class_key i_mutex_dir_key;
};

和路径查找相关:

struct nameidata(include/linux/namei.h)

struct nameidata {
    struct path path;
    struct qstr last;
    struct path root;
    struct inode    *inode; /* path.dentry.d_inode */
    unsigned int    flags;
    unsigned    seq, m_seq;
    int     last_type;
    unsigned    depth;
    char *saved_names[MAX_NESTED_LINKS + 1];
};

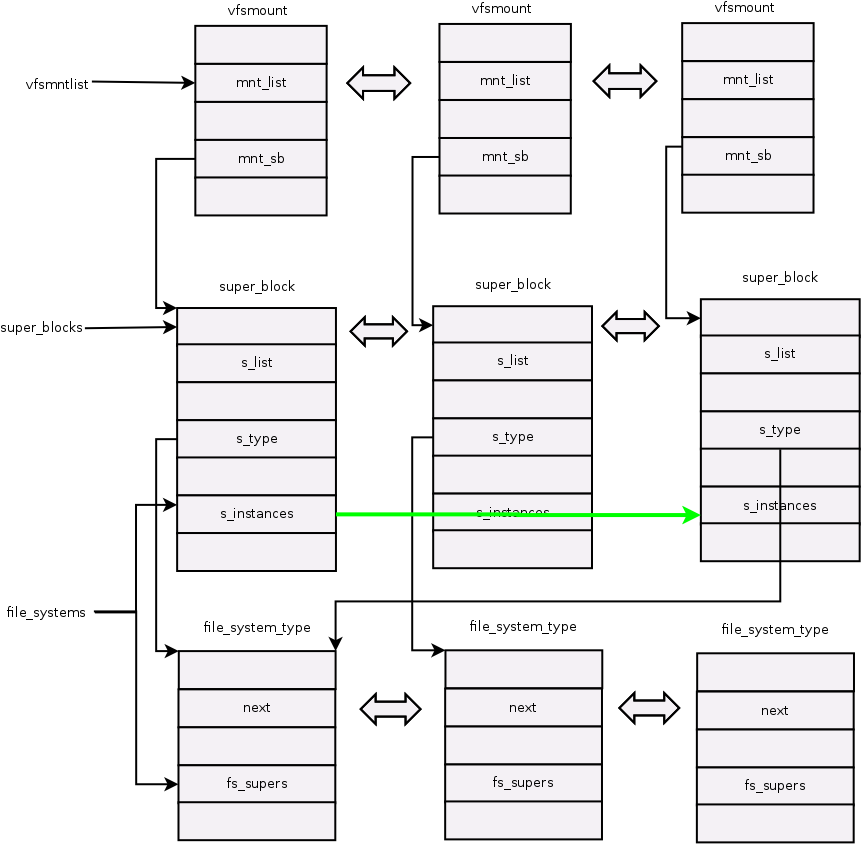
被Linux支持的文件系统,都有且仅有一个file_system_type结构而不管它有零个或多个实例被安装到系统 中。每安装一个文件系统,就对应有一个超级块和安装点。也就是说如果有多个ext4 文件系统,也就有多个ext4的super_block 与 vfsmount 。

超级块通过它的一个域s_type指向其对应的具体的文件系统类型。具体的 文件系统通过file_system_type中的一个域fs_supers链接具有同一种文件类型的超级块。同一种文件系统类型的超级块通过域s_instances链 接。


通过下图,我们可以看到第一个与第三个super_block都指向同一个file_system_type

super_block


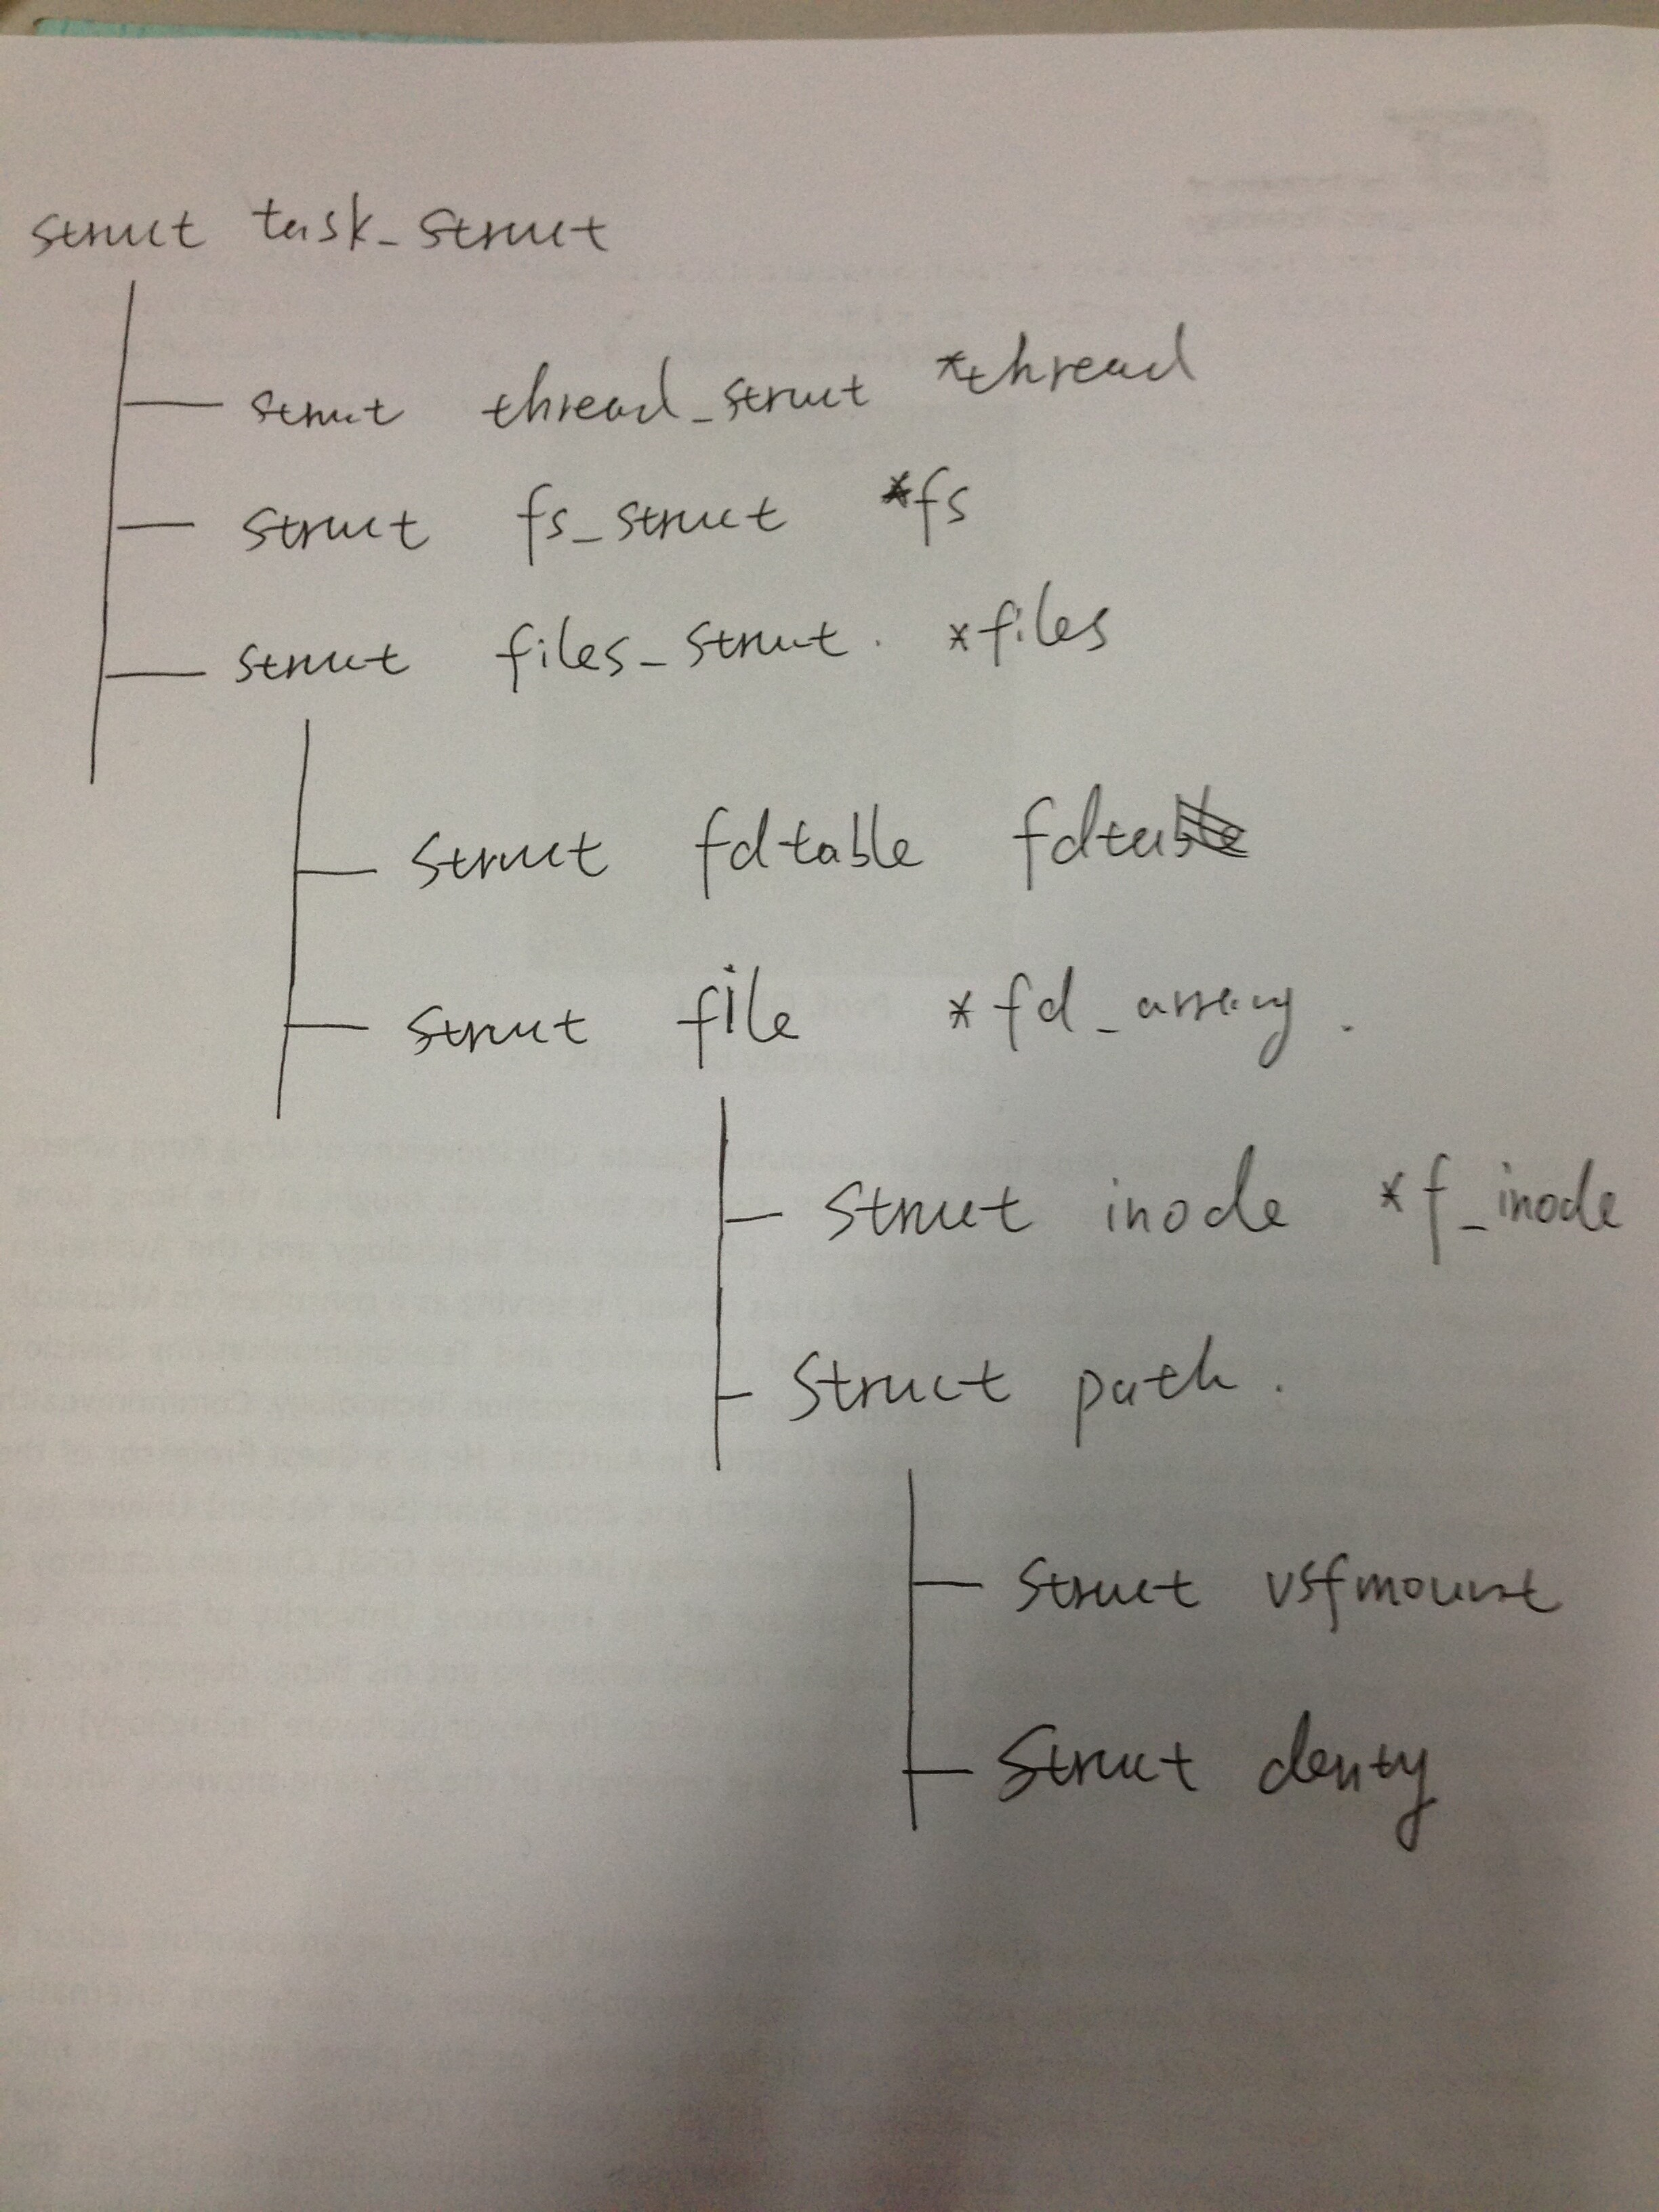
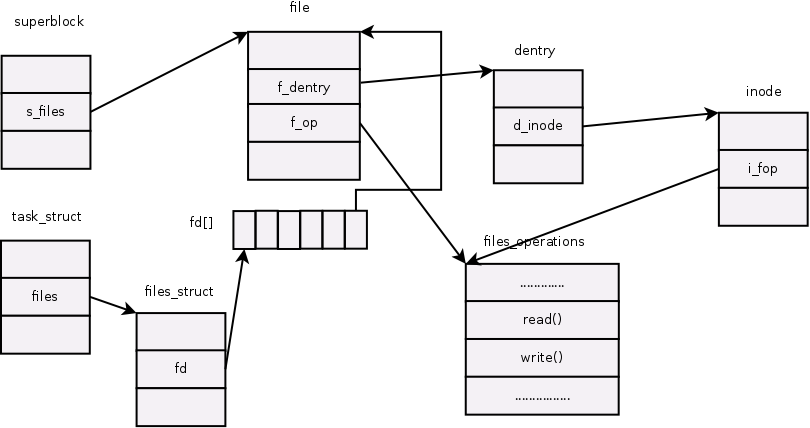
从下图可知,进程通过task_struct中的一个域files_struct files来找到它当前所打开的文件对象;而我们通常所说的文件 描述符其实是进程打开的文件对象数组的索引值。文件对象通过域f_dentry找到它对应的dentry对象,再由dentry对象的域d_inode找 到它对应的索引结点,这样就建立了文件对象与实际的物理文件的关联。

这里有一个非常重要的数据结构

struct files_struct(include/linux/fdtable.h)

/*
 * Open file table structure
 */
struct files_struct {
  /*
   * read mostly part
   */
    atomic_t count;
    struct fdtable __rcu *fdt;
    struct fdtable fdtab;
  /*
   * written part on a separate cache line in SMP
   */
    spinlock_t file_lock ____cacheline_aligned_in_smp;
    int next_fd;
    unsigned long close_on_exec_init[1];
    unsigned long open_fds_init[1];
    struct file __rcu * fd_array[NR_OPEN_DEFAULT];
};

我们可以看到fd_array 这个二维fd连接一个struct file类型的数据结构,这个struct file就是连接进程与文件的媒介,比dentry,inode更加高级!

super_block_and_task


通过学习VFS文件结构,我们就可以理解跨文件系统传输的基本原理。

下面的图我是按照kernel 3.14.8来画的,可以清晰的看出task_struct文件结构:


QQ图片20141027214645


Kdump 与 grub2 操作

October 24th, 2014 by JasonLe's Tech 1,577 views

我们在调试kernel的时候,经常会出现kernel panic。这时我们system全部按键失灵,无法查看dmesg信息。

这时我们就要使用kdump工具。他会在system 重启前,将dmesg和vmcore信息保存到默认路径/var/crash/下

[root@localhost lzz]# vim /var/crash/127.0.0.1-2014.10.24-20\:22\:03/vmcore
vmcore            vmcore-dmesg.txt
[root@localhost lzz]# vim /var/crash/127.0.0.1-2014.10.24-20\:22\:03/vmcore
vmcore            vmcore-dmesg.txt

kdump工具主要是面向redhat产品,由于我使用的是fedora,比较好的兼容了redhat5.


最主要是安装 yum install –enablerepo=fedora-debuginfo –enablerepo=updates-debuginfo kexec-tools crash kernel-debuginfo kdump

然后在使用systemctl start kdump 启动服务

[root@localhost 127.0.0.1-2014.10.24-20:22:03]# systemctl status kdump
kdump.service - Crash recovery kernel arming
   Loaded: loaded (/usr/lib/systemd/system/kdump.service; enabled)
   Active: active (exited) since 五 2014-10-24 20:23:01 CST; 2min 5s ago
  Process: 641 ExecStart=/usr/bin/kdumpctl start (code=exited, status=0/SUCCESS)
 Main PID: 641 (code=exited, status=0/SUCCESS)
   CGroup: /system.slice/kdump.service

10月 24 20:23:01 localhost.localdomain kdumpctl[641]: kexec: loaded kdump kernel
10月 24 20:23:01 localhost.localdomain kdumpctl[641]: Starting kdump: [OK]
10月 24 20:23:01 localhost.localdomain systemd[1]: Started Crash recovery kernel arming.

PS:由于在linux发行版中,各大发行版逐渐开始使用systemctl ,所以chkconfig/service 命令都会在不久以后移除。

学习system  systemd-vs-sysVinit-cheatsheet

在配置linux kernel for mce-inject中

我们要在grub2中进行一些配置:

在grub2中,/boot/grub2/grub.cfg是脚本自动生成的(使用grub2-mkconfig命令)

我们需要在[root@localhost 127.0.0.1-2014.10.24-20:22:03]# vim /etc/default/grub

GRUB_TIMEOUT=5
GRUB_DISTRIBUTOR="$(sed 's, release .*$,,g' /etc/system-release)"
GRUB_DEFAULT=saved
RUB_CMDLINE_LINUX="rd.lvm.lv=fedora/swap rd.md=0 rd.dm=0 $([ -x /usr/sbin/rhcrashkernel-param ] && /usr/sbin/rhcrashkernel-p    aram || :) rd.luks=0 vconsole.keymap=us rd.lvm.lv=fedora/root rhgb quiet crashkernel=240M"
GRUB_DISABLE_RECOVERY="true"
GRUB_THEME="/boot/grub2/themes/system/theme.txt"

在RUB_CMDLINE_LINUX中,我们在最后家一个crashkernel=240M ,这个240M是根据1GB-80M来计算的,太小的内存会造成kdump service 启动失败!

然后使用

# grub2-mkconfig -o /boot/grub2/grub.cfg

会自动更新grub2启动脚本,我们在/boot/grub2/grub.cfg看到生成的grub信息。

然后启动之后我们通过free -m /top命令看memory都会变小!也就意味着内存有一部分被分出去作crashkernel内存区域!

其实这个kdump实质就是在kernel crash掉后,system启动了crashkernel 来收集信息。


参考:

http://blog.csdn.net/sabalol/article/details/7043313

http://www.ibm.com/developerworks/cn/linux/l-kexec/

https://access.redhat.com/documentation/en-US/Red_Hat_Enterprise_Linux/7/html/Kernel_Crash_Dump_Guide/sect-kdump-config-cli.html

https://access.redhat.com/documentation/en-US/Red_Hat_Enterprise_Linux/7/pdf/Kernel_Crash_Dump_Guide/Red_Hat_Enterprise_Linux-7-Kernel_Crash_Dump_Guide-en-US.pdf