Archive for January, 2015

从0构建一个基于BananaPi的OpenWrt系统

January 28th, 2015

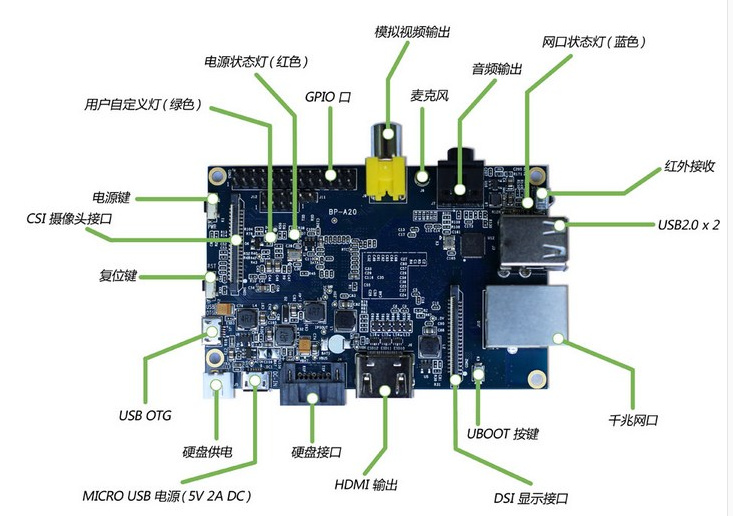
最近对于BananaPi系列的开发板比较感兴趣,于是在网上淘宝淘到一个BananaPi开发板,我使用的是BananaPi V1版本,目前官方已经开发出BananaPi Pro版本,自带无线模块。大家可以看一下http://www.lemaker.org/

具体硬件参数,基本与pro相同。

QQ截图20150128150750

下面开始烧录OpenWrt的系统。由于我对内核比较熟悉,我直接是从仓库构建的openwrt。如果对于openwrt不熟悉的话,可以从http://downloads.openwrt.org/下载对应的版本,但是需要注意的是由于openwrt属于嵌入式系统,要想让系统在板子上运行起来,我们需要下载对应的版本的img。

如果你的硬件不在http://downloads.openwrt.org/barrier_breaker/14.07/这个列表中,又有些技术基础的话,最好从仓库clone,自己构建,可以省很多时间!

因为官方默认的镜像,不带usb-mod,也就是不支持usb转Ethernet接口,这个在我初期构建的时候麻烦很大!

git 仓库地址:https://github.com/openwrt-mirror/openwrt

将仓库pull下来之后,我们可以从linux的仓库中通过apt-get/yum方式安装下载最新的交叉编译环境包。下面的图是apt的,关于yum的,可以使用yum search进行查找,名字应该差不多。

sudo apt-get install gcc
sudo apt-get install g++
sudo apt-get install binutils
sudo apt-get install patch
sudo apt-get install bzip2
sudo apt-get install flex
sudo apt-get install bison
sudo apt-get install make
sudo apt-get install autoconf
sudo apt-get install gettext
sudo apt-get install texinfo
sudo apt-get install unzip
sudo apt-get install sharutils
sudo apt-get install subversion
sudo apt-get install libncurses5-dev
sudo apt-get install ncurses-term
sudo apt-get install zlib1g-dev
sudo apt-get install gawk
sudo apt-get install asciidoc
sudo apt-get install libz-dev

我们可以像平时编译内核那种方式,通过make menuconfig方式,裁剪内核,最主要的是进入这个界面,我们要指定构建内核的芯片,和构建目标。也就是Target system和Target Profile ,Target Images我们选择ext4系统与GZip Images就足够了。

截图 - 2015年01月28日 - 19时45分34秒

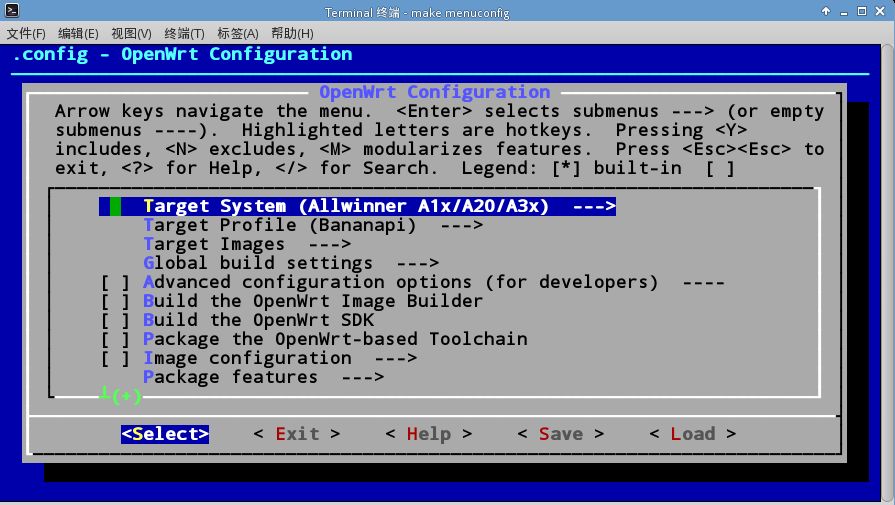
然后在下面的Iuci中选择需要构建的包,因为Openwrt管理界面是网页形式,所以要选择一个http服务器,我们默认自选uhttpd即可,如果又选了其他的服务器,可能存在登陆错误的现象!如果你需要Usb一系列设备,就需要在Kernel Modules中编译相关模块。

最后保存设置,使用make V=99开始编译,第一次编译需要下载很多外部库,总的时间3h左右,如果不清理的话,下次编译时间会大大缩短。

———————-

现在讲img烧录到板子的SD中,并让板子从SD启动就好。

方案一:

使用自己编译的img,直接dd刻录。http://www.lemaker.org/resources/9-39/banana_pi_quick_start_guide.html

Run the sudo dd bs=4M if=[path]/[imagename] of=/dev/sdx command to write image file to SD card. Wait patiently to successfully complete writing. Please note that block size set to 4M will work most of the time, if not, please try 1M, although 1M will take considerably longer.

方案二:

使用官方提供的镜像,uboot

一般情况我们需要手动分区,然后在对于每个分区进行操作,比如我们操作的SD卡是/dev/sdb
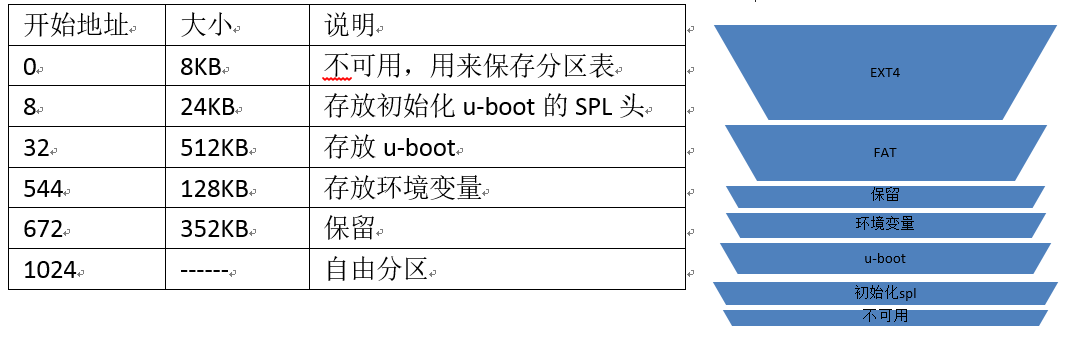
因为这个板子是全智A20,我们要根据官方的指导文件,进行分区。
2

首先fdisk /dev/sdb

进入使用o清除所有分区!

所以我们必须把SD卡的前1M空出来,然后存放uboot的SPL头,放在seek=8 bs=1024处,seek即为偏移量。然后在开始地址1024后存放uboot,uboot烧写完成,再分一个区存放ext4,也就是rootfs的Openwrt实体!

$dd if=/dev/zero of=/dev/sda bs=1M count=1
$dd if=openwrt-sunxi-Bananapi-u-boot-with-spl.bin of=/dev/sda bs=1024 seek=8
//之后使用fdisk分区,分成sdb1 sdb2
$fdisk /dev/sda

a)n->默认p->默认1->默认2048->34815
b)n->默认p->默认2->默认34816->默认剩余全部,再次p查看分区,但sdb1要改为fat格式; t更改分区类型,指定分区号,指定类型,L查看所有分区类型,fat的类型编号为c;w保存所有操作。

$mkfs.vfat /dev/sdb1
$mkfs.ext4 /dev/sdb2
$mount /dev/sdb1 /media/pi/1
$mount /dev/sdb2 /media/pi/2

我们需要的文件主要是
openwrt-sunxi-root.ext4
openwrt-sunxi-uImage
sun7i-a20-bananapi.dtb
openwrt-sunxi-Bananapi-u-boot-with-spl.bin
openwrt-sunxi-Bananapi-uEnv.txt

在1中我们主要是在1中新建一个文件,打开后添加openwrt-sunxi-Bananapi-uEnv.txt中的内容,保存为boot.cmd,然后

$mkimage -C none -A arm -T script -d boot.cmd boot.scr

在文件夹1中直接拷贝sun7i-a20-bananapi.dtb和openwrt-sunxi-uImage文件,两个文件的文件名要和刚才boot.cmd中的相同;

$dd if=/xxx/openwrt-sunxi-root.ext4 of=/dev/sdb2 bs=1M //xxx替换为自己的路径

然后烧写完毕,我们可以连接串口进行通讯,需要特定的硬件,我主要应用实验室特殊的条件,直接请教硬件大神!
之后我们可以使用ssh方式将板子与电脑直接使用网线连接!

之后就可以随意配置了。

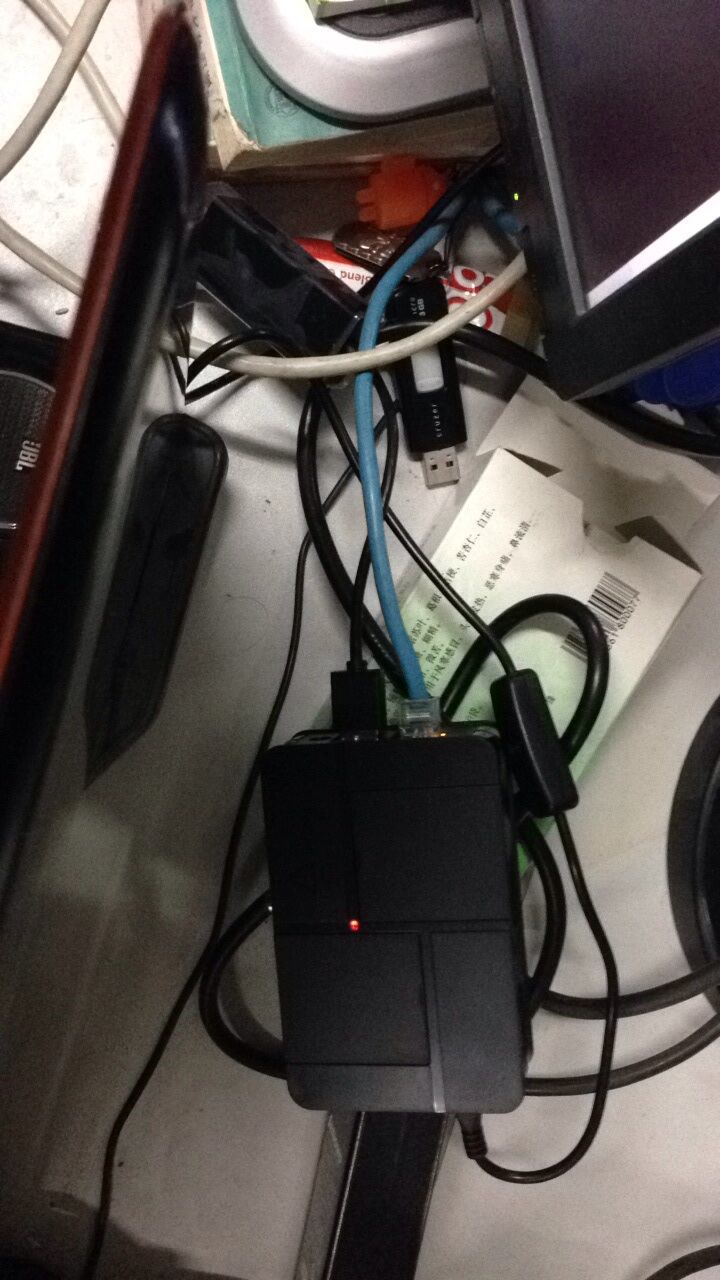
附一张烧写好的板子,由于官方送了外壳,我基本就把他安装好了。运行状态图:

QQ图片20150128202544
———————–

官方默认不编译的库,我们就要手动编译,我们首先下载这个板子的官方编译环境具体包的名字:OpenWrt-SDK-sunxi-for-linux-x86_64-gcc-4.8-linaro_uClibc-0.9.33.2.tar.bz2

然后把需要的package放到解压后这个文件夹下的package下,使用make menuconfig编译。编译完成后在bin下面会找到ipk包!

然后我们可以通过vsftpd方式传到路由器中,通过opkg install 安装。至于如果你需要基于luci-app-*的包,需要搜索或者到http://sourceforge.net/projects/openwrt-dist/查找。

之后我们登陆路由器官方网页界面进行配置。这个需要我们指定路由器网关!

关于shadowsockets 与 chinadns设置:

 http://www.tuicool.com/articles/fauueym

https://github.com/shadowsocks/openwrt-shadowsocks

https://github.com/aa65535/openwrt-chinadns


这次嵌入式烧板子,让我对于板子不再陌生,原来kernel与硬件接触如此紧密!


__schedule()调度分析

January 22nd, 2015

主实现代码:http://lxr.free-electrons.com/source/kernel/sched/core.c#L2765

调度这一块,因为存在很多的调度policy,kernel为了分离mechanism与具体policy,在__schedule()中实现task的切换,具体policy在pick_next_task() 中实现。

内核中对进程调度的方法有两种,其一为周期性调度器(generic scheduler),它对进行进行周期性的调度,以固定的频率运行;其二为主调度器(main scheduler),如果进程要进行睡眠或因为其他原因主动放弃CPU,那么就直接调用主调度器。

其中,主调度器是__schedule() ,而周期性调度器是void scheduler_tick(void)。这个函数负责每个rq的平衡,保持每个cpu都有task可以运行,这个程序由timer调度。http://lxr.free-electrons.com/source/kernel/sched/core.c#L2524

__schedule()是调度的核心函数,在这个函数里面是主要是从rq队列中,选择进程。除了切换上下文状态,还要使用 pick_next_task() 使用这个选择下一个进程,具体到使用哪种调度policy都在这个struct sched_class结构体里保存着。

目前kernel在SMP环境下使用的调度算法是CFS算法。具体我们先来看pick_next_task()函数。
我们发现具体的policy在fair_sched_class 定义,GNU C的语法就是用C 的strut来模拟C++的class方式,然后在fair.c中定义了众多的函数,这种方式就是一种钩子函数。具体CFS策略这里不再细讲,之后我会专门来分析CFS调度算法。

2692 static inline struct task_struct *
2693 pick_next_task(struct rq *rq, struct task_struct *prev)
2694 {
2695         const struct sched_class *class = &fair_sched_class;
2696         struct task_struct *p;
2697 
2698         /*
2699          * Optimization: we know that if all tasks are in
2700          * the fair class we can call that function directly:
2701          */
2702         if (likely(prev->sched_class == class &&
2703                    rq->nr_running == rq->cfs.h_nr_running)) {
2704                 p = fair_sched_class.pick_next_task(rq, prev);
2705                 if (unlikely(p == RETRY_TASK))
2706                         goto again;
2707 
2708                 /* assumes fair_sched_class->next == idle_sched_class */
2709                 if (unlikely(!p))
2710                         p = idle_sched_class.pick_next_task(rq, prev);
2711 
2712                 return p;
2713         }
2714 
2715 again:
2716         for_each_class(class) {
2717                 p = class->pick_next_task(rq, prev);
2718                 if (p) {
2719                         if (unlikely(p == RETRY_TASK))
2720                                 goto again;
2721                         return p;
2722                 }
2723         }
2724 
2725         BUG(); /* the idle class will always have a runnable task */
2726 }

const struct sched_class fair_sched_class(kernel/sched/fair.c)

在CFS算法中,我们看下面有两个比较特殊:

7944 #ifdef CONFIG_SMP
7945 .select_task_rq = select_task_rq_fair,
7946 .migrate_task_rq = migrate_task_rq_fair,

多CPU必然存在进程并行运行的情况,7945行是公平的选择特定的task,7956行是进行rq中task的迁移,我们知道每个cpu都对应着一个rq队列,这个不一定是quenu,而是red-black tree。对于rq中task的迁移,在

select_task_rq_fair(struct task_struct *p, int prev_cpu, int sd_flag, int wake_flags)

这个函数正是真正的完全公平调度算法! 

__schedule()函数是进程的主调度器,下面我们来分析这个的实现

2765 static void __sched __schedule(void)
2766 {
2767         struct task_struct *prev, *next;
2768         unsigned long *switch_count;
2769         struct rq *rq;
2770         int cpu;
2771 
2772 need_resched:
2773         preempt_disable();
2774         cpu = smp_processor_id();
2775         rq = cpu_rq(cpu);
2776         rcu_note_context_switch(cpu);
2777         prev = rq->curr;
2778 
2779         schedule_debug(prev);
2780 
2781         if (sched_feat(HRTICK))
2782                 hrtick_clear(rq);
2783 
2784         /*
2785          * Make sure that signal_pending_state()->signal_pending() below
2786          * can't be reordered with __set_current_state(TASK_INTERRUPTIBLE)
2787          * done by the caller to avoid the race with signal_wake_up().
2788          */
2789         smp_mb__before_spinlock();
2790         raw_spin_lock_irq(&rq->lock);
2791 
2792         switch_count = &prev->nivcsw;
2793         if (prev->state && !(preempt_count() & PREEMPT_ACTIVE)) {
2794                 if (unlikely(signal_pending_state(prev->state, prev))) {
2795                         prev->state = TASK_RUNNING;
2796                 } else {
2797                         deactivate_task(rq, prev, DEQUEUE_SLEEP);
2798                         prev->on_rq = 0;
2799 
2800                         /*
2801                          * If a worker went to sleep, notify and ask workqueue
2802                          * whether it wants to wake up a task to maintain
2803                          * concurrency.
2804                          */
2805                         if (prev->flags & PF_WQ_WORKER) {
2806                                 struct task_struct *to_wakeup;
2807 
2808                                 to_wakeup = wq_worker_sleeping(prev, cpu);
2809                                 if (to_wakeup)
2810                                         try_to_wake_up_local(to_wakeup);
2811                         }
2812                 }
2813                 switch_count = &prev->nvcsw;
2814         }
2815 
2816         if (task_on_rq_queued(prev) || rq->skip_clock_update < 0)
2817                 update_rq_clock(rq);
2818 
2819         next = pick_next_task(rq, prev);
2820         clear_tsk_need_resched(prev);
2821         clear_preempt_need_resched();
2822         rq->skip_clock_update = 0;
2823 
2824         if (likely(prev != next)) {
2825                 rq->nr_switches++;
2826                 rq->curr = next;
2827                 ++*switch_count;
2828 
2829                 context_switch(rq, prev, next); /* unlocks the rq */
2830                 /*
2831                  * The context switch have flipped the stack from under us
2832                  * and restored the local variables which were saved when
2833                  * this task called schedule() in the past. prev == current
2834                  * is still correct, but it can be moved to another cpu/rq.
2835                  */
2836                 cpu = smp_processor_id();
2837                 rq = cpu_rq(cpu);
2838         } else
2839                 raw_spin_unlock_irq(&rq->lock);
2840 
2841         post_schedule(rq);
2842 
2843         sched_preempt_enable_no_resched();
2844         if (need_resched())
2845                 goto need_resched;
2846 }

在2773 禁止进程抢占调度器,在2774 ~ 2777 获取当前cpu的id,并获取当前cpu的rq,切换RCU,获取当前rq运行的task,并赋值为prev。

203 #define TASK_RUNNING            0
204 #define TASK_INTERRUPTIBLE      1
205 #define TASK_UNINTERRUPTIBLE    2

我们发现TASK_RUNNING 值为0,这就使得2793行,如果判断当前的进程在运行,就不会进行调度,只会更新rq的clock。
反之如果当前占用cpu的task处于TASK_INTERRUPTIBLE态,却收到了某个唤醒它的信号,那么当前进程的标志被更新为TASK_RUNNING,等待再次被调度。否则,通过deactivate_task()将当前进程prev从就绪队列中删除。

之后在2819行使用pick_next_task()函数,去的当前rq的新的进程,然后清除之前prev进程的标志位。
获取要调度的新的进程,之后就是各种调度了。从2824~2839 这段代码会判断当前的选择的进程与之前的进程是否相同,相同就不用再切换上下文了。

一切调度完成,放开preempt_enable ,系统可以开始抢占。
参考:
http://www.makelinux.net/books/lkd2/ch09lev1sec9


Coccinelle 使用

January 20th, 2015

Coccinelle是一个程序的匹配和转换引擎,它提供了语言SMPL(语义补丁语言)用于指定C代码所需的匹配和转换。Coccinelle 最初是用来帮助Linux的演变,支持更改库应用程序编程接口,比如重命名一个函数,增加一个依赖于上下文的函数参数或者重新组织一个数据结构。除此之外,Coccinelle页被人用来查找或者修复系统代码的bug。

项目地址:https://github.com/coccinelle/coccinelle

安装在这里不再赘述,这里要注意的是需要安装python的devel包,否则这个程序无法运行!

$git clone https://github.com/coccinelle/coccinelle
$git tag > git checkout -b build coccinelle-1.0.0-rc21
$apt-get install python2.6-dev libpycaml-ocaml-dev libmenhir-ocaml-dev menhir ocaml-native-compilers \
ocamlduce camlp4-extra ocaml-findlib pkg-config texlive-fonts-extra
$./configure --with-python --with-menhir
$make all
$apt-get remove coccinelle (prevent conflict)
$make install

安装完毕之后,我们可以定义脚本

@search@
identifier fn,call;
statement s1,s2;
expression E1,E2;
int fd;
position p;
constant C;
@@

<+...
* fd=open@p(...);
//  ...when != fn(<+...fd...+>);
  ...when !=fd=C
* if (fd<0||...){...}
...+>   

@script:python@
p << search.p;
@@

print "%s equal expression" % (p[0].line)

之后我们可以运行这个脚本,可以快速从代码中匹配。

$spatch -sp_file demos/simple.cocci demos/simple.c -o /tmp/new_simple.c

目前这个项目的问题是文档不是很完善,期待之后这个项目的发展。这个工具吸引人的地方在于可以智能的匹配譬如i++ <=> i=i+1这种形式。

目前我们可以更多的参考/usr/local/share/coccinelle/standard.iso


Safety Engineering 关键概念学习

January 19th, 2015

1.Safety is about understanding potential causality in systems with limited determinism.

  • Control
  • Reduce Hazard

在中文中Safety与Security 概念很类似,都是安全的含义,但是我们要分清楚,区别在于是否得到system Administrator guarantee .

Security 是在没有 guarantee保证的情况下,hacker walks into system without guarantee.

Safety 则是让系统在任何情况下under my control.

2.Fault/Error/Failure

  • Fault is a defect within the system – Software Bugs/Hardware fault/Memory Fault
  • Error is a deviation from the required operation of system or subsystem
    • A fault may lead to an error, i.e., error is a mechanism by which the fault becomes apparent
  • A system failure occurs when the system fails to perform its required function

所以总的来说,Failure对于system可能会造成灾难性后果(catastrophe)。

Functional safety is a resonable response to the increased safety needs but the first option should stay to design simple and clean systems from
the start and Say No where resonable safety is not possible.

3.Fault Tolerance and Robustness

System happened fault ,system won’t walk into fails to perform its required function This is tolerance !

When system faces hazard,failure lead system walk into unsafety state while reliability make system safety (It ‘s really hard!)

Reliability Definitions The ability of an item to perform a required function, under given environmental and operational conditions and for a stated period of
time

4.Mechanisms and Policies

  • Mechanisms specifies how it is to be done(与硬件软件结合相关,不能轻易改变)
  • Policies is what is to be done(具体算法)

The separation of mechanism and policy is important to provide flexibility to a system. If the interface between mechanism and policy is well defined, the change of policy may affect only a few parameters. On the other hand, if interface between these two is vague or not well defined, it might involve much deeper change to the system.

http://www.personal.kent.edu/~rmuhamma/OpSystems/Myos/mechanicPolicy.htm

正如kernel中的scheduler一样,这个就是Mechanisms/Policies分离的例子,Mechanisms负责切换进程实体prev,next tasks,包括context_switch,而Policies 负责根据某个策略去是选取特定的task,包括RR,CFS等等…具体对应的函数就是pick_next_task()


参考:

http://lxr.free-electrons.com/source/kernel/sched/core.c#L2693

cgroup 介绍(1)

January 14th, 2015

cgroups (abbreviated from control groups) is a Linux kernel feature that limits, accounts for and isolates the resource usage (CPU, memory, disk I/O, network, etc.) of a collection of processes.

cgroup 在内核的发展是从从2007年 2.6.24内核引入的机制。经过这些年的发展,已经发展成为docker /LXC 中间力量

cgroup定义,很多中文资料已经说明非常详细了,我这里就过多赘述。

值得注意的是,cgroup最初是依靠sysfs作为与用户的控制接口,因为会存在很多hierarchy。

vfs在cgroup这里受到一些滥用,因此cgroup也积累的很多的问题,在vfs中可能会出现重名死锁。
在3.14的版本后,也就是2013之后,kernel对cgroup进行了巨大的修改。很多的数据结构都有了巨大的变化。其中提出来一种 Unified hierarchy 。

缺点[1][2]:

1)虽然这种树型结构可以带来一定的灵活性,但是在实际应用中可能存在一些问题,比如每个子系统在一个hierarchy只能有一个实例,显然freezer也只能有一个实例,freezer不得不移动去控制其他进程。
2)所有子系统绑定在hierarchy中,一旦hierarchy与具体pid绑定,控制granularity不好把握。
3)因为是树型结构,所以树的深度是无限的,这就使得在一个有限的资源中,子hierarchy可能会分配出有限资源外的资源。也使得管理更加复杂。
4)对多hierarchy支持限制了cgroup的使用,因为我们可以知道我们可以有12个hierarchy绑定12个子系统,也可以只有一个hierarhy绑定12个子统统。

在kernel 3.16中开发了Unified hierarchy。它的目的是通过使用其他的结构,同时解决了上述缺点,保持足够的灵活性,对于大多数用例

这个特性目前没有在本文中讨论。

简单提一点就是:这种新的unified hierarchy不允许remount/rename

——————-

由于从3.14后cgroup大改,放弃使用sysfs,创建一个kernfshttp://en.wikipedia.org/wiki/Kernfs_%28Linux%29

这种方式说白了就是抽出了sysfs的核心,创建了一种新的文件系统,可以进行复用。但是这个kernfs目前只是由cgroup在使用

https://git.kernel.org/cgit/linux/kernel/git/torvalds/linux.git/commit/?id=2bd59d48ebfb3df41ee56938946ca0dd30887312

这个里面对于3.14之后的更改说的比较清晰。因为使用kernfs,vfs被移除,也就是说super_block dentry, inode 和 bdi 被移除,使用cgroup_mount()直接挂载根由vfs管理的注册结构体转移到 kernfs_ops and kernfs_syscall_ops。

具体的子系统,我这里简单的提一下:

  • blkio — 这个子系统为块设备设定输入/输出限制,比如物理设备(磁盘,固态硬盘,USB 等
    等)。
  • cpu — 这个子系统使用调度程序提供对 CPU 的 cgroup 任务访问。说白了就是时间片大小!
  • cpuacct — 这个子系统自动生成 cgroup 中任务所使用的 CPU 报告。
  • cpuset — 这个子系统为 cgroup 中的任务分配独立 CPU(在多核系统)和内存节点。
  • devices — 这个子系统可允许或者拒绝 cgroup 中的任务访问设备。
  • freezer — 这个子系统挂起或者恢复 cgroup 中的任务。
  • memory — 这个子系统设定 cgroup 中任务使用的内存限制,并自动生成由那些任务使用的
    内存资源报告。
  • net_cls — 这个子系统使用等级识别符(classid)标记网络数据包,可允许 Linux 流量控制程
    序(tc)识别从具体 cgroup 中生成的数据包。
  • ns — 名称空间子系统。

比如我们要创建一个cpu核数和memory大小受限的cgroup:

1)创建一个目录mkdir

2)挂载新的文件系统,如果我们在/sys/fs/cgroup挂载,我们要先挂载一个tmpfs,因为sysfs下不允许创建文件夹,其他允许创建文件夹的文件系统,不需要挂载tmpfs

3)$mount -t cgroup -o cpuset,memory cgroup_cpu_mem  /mnt/cgroup_cpu_mem

4))我们挂载到root_cgroup的文件系统成功

5)

[lzz@localhost cgroup_cpu_mem]$ ls
cgroup.clone_children   cpuset.memory_pressure_enabled   memory.kmem.slabinfo                memory.pressure_level
cgroup.event_control    cpuset.memory_spread_page        memory.kmem.tcp.failcnt             memory.soft_limit_in_bytes
cgroup.procs            cpuset.memory_spread_slab        memory.kmem.tcp.limit_in_bytes      memory.stat
cgroup.sane_behavior    cpuset.mems                      memory.kmem.tcp.max_usage_in_bytes  memory.swappiness
cgroup_test             cpuset.sched_load_balance        memory.kmem.tcp.usage_in_bytes      memory.usage_in_bytes
cpuset.cpu_exclusive    cpuset.sched_relax_domain_level  memory.kmem.usage_in_bytes          memory.use_hierarchy
cpuset.cpus             memory.failcnt                   memory.limit_in_bytes               notify_on_release
cpuset.mem_exclusive    memory.force_empty               memory.max_usage_in_bytes           release_agent
cpuset.mem_hardwall     memory.kmem.failcnt              memory.move_charge_at_immigrate     tasks
cpuset.memory_migrate   memory.kmem.limit_in_bytes       memory.numa_stat
cpuset.memory_pressure  memory.kmem.max_usage_in_bytes   memory.oom_control

我们发现在这个root cgroup里面,包括两个系统的相关设置,分别以cpuset/memory开头,上面就是建立一个hierarchy.是一个cpusset与memory的资源集合。

6)在这个hierarchy下面,建立文件夹,就是建立新的cgroup,进入cgroup_test

7)然后这个cgroup_test中的设置都为0

8)具体每个字段含义,可以查看document https://www.kernel.org/doc/Documentation/cgroups/

9)我们简单的限定一下:

$echo 16M  > memory.memory.limit_in_bytes
$echo 1  > cpuset.cpus
$echo 0  > cpus.mems

10)这个cgroup就可以往里面添加进程了,我们可以先添加一个shell终端 echo $$ > tasks ,然后通过这个终端启动的都会添加到该cgroup!


[1] http://lwn.net/Articles/606699/
[2] https://www.kernel.org/doc/Documentation/cgroups/unified-hierarchy.txt