Archive for the ‘Linux下C编程’ category

setjmp和longjmp的另类使用

February 3rd, 2016

C语言的运行控制模型,是一个基于栈结构的指令执行序列,表现出来就是call/return: call调用一个函数,然后return从 一个函数返回。在这种运行控制模型中,每个函数调用都会对应着一个栈帧,其中保存了这个函数的参数、返回值地址、局部变量以及控制信息等内容。当调用一个 函数时,系统会创建一个对应的栈帧压入栈中,而从一个函数返回时,则系统会将该函数对应的栈帧从栈顶退出。正常的函数跳转就是这样从栈顶一个一个栈帧逐级地返回。

setjmp的返回值:直接调用该函数,则返回0;若由longjmp的调用,导致setjmp被调用,则返回val(longjmp的第二个参数)。

之前看APEU的相关章节,setjmp和longjmp只是一个跨函数跳转的库函数调用,可以作为后悔药使用,但是今天我发现这个库函数可以作为协程使用。协程我之前一直不理解,认为有了进程线程就可以了,没有必要存在协程,但是发现在不支持这些多线程多进程的操作系统平台上协程意义重大。

这个时候协程就可以派上用场了,我们可以依赖协程模拟多进程这种需求,我们需要写一个thread库供协程调用,具体的thread工作步骤就是:

  1. 存储当前线程所在上下文,设置一个存储队列专门存储thread context
  2. 为每个线程分配一个stack空间
  3. 将esp指向栈顶,eip指向要执行代码的entry,当然包括参数arg,arg具体调用方式就是(current->entry(current->arg)),这一个非常相似于c++中的委托
  4. 当需要调度线程时,将当前执行代码设置setjmp,保存线程结构体中的thread context到具体全局的数组
  5. 如果需要调度另外一个线程,使用longjmp跳入到线程结构thread context

当然了在linux下有glibc提供相关库函数实现跳转,咱们不必再次造轮子,但是在裸机上,或者一种新的体系结构中,我们必须自行实现setjmp和longjmp,这其中不可避免的会使用到asm。比如setjmp,首先要将返回地址和frame pointer压入栈,考虑到栈自高地址向低地址方向生长,故esp-8,然后再压入其他通用寄存器。而longjmp恢复某个线程·的上下文环境,必须指定存储context位置 ,然后将返回地址复制给eax,然后执行跳转。

struct jmp_buf
{
       unsigned j_sp;  // 堆栈指针寄存器
       unsigned j_ss;  // 堆栈段
       unsigned j_flag;  // 标志寄存器
       unsigned j_cs;  // 代码段
       unsigned eip;  // 指令指针寄存器
       unsigned ebp; // 基址指针
       unsigned edi;  // 目的指针
       unsigned j_es; // 附加段
       unsigned j_si;  // 源变址
       unsigned j_ds; // 数据段
};

具体线程切换伪代码:

void wthread_yield()
{
   ...
   if(current){
        if(setjmp(current->...)!=0)
             return;
        push(...)
   }
   current = next;
   longjmp(current->...)
}

考虑到执行setjmp和longjmp必须是一个控制main线程,必须由控制线程控制调用线程切换,其他线程可以主动让出时间片。这时我们必须定义一个全局变量保存线程上下文,然后维护这个数组,至于具体的逻辑形式可以是队列可以是环形队列队列等。编写thread库务必保证线程安全,不能破坏线程返回地址,否则容易core dump。

另外在linux下,可以使用这两个系统调用实现C下的异常处理try/catch,至于在setjmp和longjmp之前存在的变量务必使用volatile声明。


 参考:

http://stackoverflow.com/questions/2560792/multitasking-using-setjmp-longjmp#comment33335405_2560792
http://www.cnblogs.com/lq0729/archive/2011/10/23/2222117.html
http://www.cnblogs.com/lienhua34/archive/2012/04/22/2464859.html

再议kprobe机制

December 9th, 2015

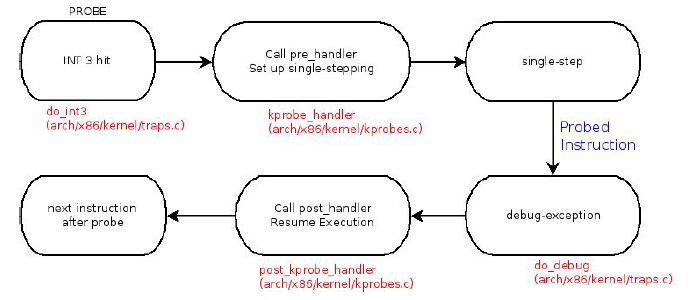
在之前的博文《SystemTap Kprobe原理》中简要的对kprobe进行了介绍,Kprobe机制是内核提供的一种调试机制,它提供了一种方法,能够在不修改现有代码的基础上,灵活的跟踪内核函数的执行。

kprobe工作原理是:
1)在注册探测点的时候,将被探测函数的指令码替换为int 3的断点指令;
2)在执行int 3的异常执行中,CPU寄存器的内容会被保存,通过通知链的方式调用kprobe的异常处理函数;
3)在kprobe的异常处理函数中,首先判断是否存在pre_handler钩子,存在钩子则执行pre_handler;
4)进入单步调试,通过设置EFLAGS中的TF标志位,并且把异常返回的地址修改为保存的原指令码;
5)代码返回,执行原有指令,执行结束后触发单步异常;
6)在单步异常的处理中,清除标志位,执行post_handler流程,并最终返回执行正常流程;

Kprobe提供了三种形式的探测点,一种是最基本的kprobe,能够在指定代码执行前、执行后进行探测,但此时不能访问被探测函数内的相关变量信息;一种是jprobe,用于探测某一函数的入口,并且能够访问对应的函数参数;一种是kretprobe,用于完成指定函数返回值的探测功能。而jprobe与kretprobe都是基于kprobe实现的。

下面对kprobe代码简要分析:

在init_kprobes()初始化函数中,将kprobe注册到kprobe_exceptions_notify通知链

static int __init init_kprobes(void)
{
     ...
     err = arch_init_kprobes();
     if (!err)
        err = register_die_notifier(&kprobe_exceptions_nb);
     if (!err)
        err = register_module_notifier(&kprobe_module_nb);

     kprobes_initialized = (err == 0);

     if (!err)
       init_test_probes();
     return err;
}
static struct notifier_block kprobe_exceptions_nb = {
    .notifier_call = kprobe_exceptions_notify,
    .priority = 0x7fffffff /* we need to be notified first */
};

int __kprobes register_kprobe(struct kprobe *p)函数则是我们在内核模块中所调用的,经过对调用点一系列的检查,最后将将kprobe加入到相应的hash表内,并将将探测点的指令码修改为int 3指令: __arm_kprobe(p);

int __kprobes register_kprobe(struct kprobe *p) {
...
 INIT_HLIST_NODE(&p->hlist);
 hlist_add_head_rcu(&p->hlist,
        &kprobe_table[hash_ptr(p->addr, KPROBE_HASH_BITS)]);

 if (!kprobes_all_disarmed && !kprobe_disabled(p))
     __arm_kprobe(p);
...

当内核调用到这个探测点时,触发int 3,经过中断处理,调用到do_int3() 函数,如果我们使能了CONFIG_KPROBES选项,那么跳入kprobe_int3_handler执行,该函数为kprobe的核心函数。

dotraplinkage void notrace do_int3(struct pt_regs *regs, long error_code)
{
...
#ifdef CONFIG_KPROBES
         if (kprobe_int3_handler(regs))
                 goto exit;
#endif
         if (notify_die(DIE_INT3, "int3", regs, error_code, X86_TRAP_BP,
                         SIGTRAP) == NOTIFY_STOP)
                 goto exit;
...
 exit:
         ist_exit(regs);
}
static int __kprobes kprobe_handler(struct pt_regs *regs)
{
...
    addr = (kprobe_opcode_t *)(regs->ip - sizeof(kprobe_opcode_t));
//对于int 3中断,那么异常发生时EIP寄存器内指向的为异常指令的后一条指令
    preempt_disable();

    kcb = get_kprobe_ctlblk();
    /*获取addr对应的kprobe*/
    p = get_kprobe(addr);
    if (p) {
//如果异常的进入是由kprobe导致,则进入reenter_kprobe
        if (kprobe_running()) {
            if (reenter_kprobe(p, regs, kcb))
                return 1;
        } else {
            set_current_kprobe(p, regs, kcb);
            kcb->kprobe_status = KPROBE_HIT_ACTIVE;

            /*
             * If we have no pre-handler or it returned 0, we
             * continue with normal processing. If we have a
             * pre-handler and it returned non-zero, it prepped
             * for calling the break_handler below on re-entry
             * for jprobe processing, so get out doing nothing
             * more here.
             */
//执行在此地址上挂载的pre_handle函数
            if (!p->pre_handler || !p->pre_handler(p, regs))
//设置单步调试模式,为post_handle函数的执行做准备
                setup_singlestep(p, regs, kcb, 0);
            return 1;
        }
    } else if (*addr != BREAKPOINT_INSTRUCTION) {
...
    } else if (kprobe_running()) {
...
    } /* else: not a kprobe fault; let the kernel handle it */

    preempt_enable_no_resched();
    return 0;
}

setup_singlestep() 函数为单步调试函数,在该函数内会打开EFLAGS的TF标志位,清除IF标志位(禁止中断),并设置异常返回的指令为保存的被探测点的指令。

static void __kprobes setup_singlestep(struct kprobe *p, struct pt_regs *regs,
                 struct kprobe_ctlblk *kcb, int reenter)
{
    if (setup_detour_execution(p, regs, reenter))
        return;
...
    /*jprobe*/
    if (reenter) {
        save_previous_kprobe(kcb);
        set_current_kprobe(p, regs, kcb);
        kcb->kprobe_status = KPROBE_REENTER;
    } else
        kcb->kprobe_status = KPROBE_HIT_SS;
    /* Prepare real single stepping */
    /*准备单步模式,设置EFLAGS的TF标志位,清除IF标志位(禁止中断)*/
    clear_btf();
    regs->flags |= X86_EFLAGS_TF;
    regs->flags &= ~X86_EFLAGS_IF;
    /* single step inline if the instruction is an int3 */
    if (p->opcode == BREAKPOINT_INSTRUCTION)
        regs->ip = (unsigned long)p->addr;
    else
	/*设置异常返回的指令为保存的被探测点的指令*/
        regs->ip = (unsigned long)p->ainsn.insn;
}

setup_singlestep() 执行完毕后,程序继续执行保存的被探测点的指令,由于开启了单步调试模式,执行完指令后会继续触发异常,这次的是do_debug异常处理流程。然后在kprobe_debug_handler恢复现场,清除TF标志位等操作,完成kprobe调用。

dotraplinkage void do_debug(struct pt_regs *regs, long error_code)
{
...
#ifdef CONFIG_KPROBES
         if (kprobe_debug_handler(regs))
                 goto exit;
#endif
...
}
int kprobe_debug_handler(struct pt_regs *regs)
{
...
         resume_execution(cur, regs, kcb);
         regs->flags |= kcb->kprobe_saved_flags;

         if ((kcb->kprobe_status != KPROBE_REENTER) && cur->post_handler) {
                 kcb->kprobe_status = KPROBE_HIT_SSDONE;
                 cur->post_handler(cur, regs, 0);
         }

         /* Restore back the original saved kprobes variables and continue. */
         if (kcb->kprobe_status == KPROBE_REENTER) {
                 restore_previous_kprobe(kcb);
                 goto out;
         }
         reset_current_kprobe();
...
}

 总结一下kprobe流程就是下图:

Unnamed QQ Screenshot20131218210006

参考

https://lwn.net/Articles/132196/
http://www.lxway.com/82244406.htm
http://blog.chinaunix.net/uid-22227409-id-3420260.html

再议PLT与GOT

December 8th, 2015

PLT(Procedure Linkage Table)的作用是将位置无关的符号转移到绝对地址。当一个外部符号被调用时,PLT 去引用 GOT 中的其符号对应的绝对地址,然后转入并执行。

GOT(Global Offset Table):用于记录在 ELF 文件中所用到的共享库中符号的绝对地址。在程序刚开始运行时,GOT 表项是空的,当符号第一次被调用时会动态解析符号的绝对地址然后转去执行,并将被解析符号的绝对地址记录在 GOT 中,第二次调用同一符号时,由于 GOT 中已经记录了其绝对地址,直接转去执行即可(不用重新解析)。

其中PLT 对应.plt section ,而GOT对应 .got.plt ,主要对应函数的绝对地址。通过readelf查看可执行文件,我们发现还存在.got section,这个section主要对应动态链接库中变量的绝对地址。我们还要注意PLT section在代码链接的时候已经存在,存在于代码段中,而GOT存在于数据段中。

在我先前的博文ELF文件的加载,我简单的对PLT和GOT进行了介绍。这里我们增加复杂度,重新对这个动态链接机制进行分析。

foo.c:

#include <stdio.h>

void foo(int i)
{
     printf("Test %d\n",i);
}

main.c:

#include <stdio.h>
#include <unistd.h>

extern void foo(int i);

int main()
{
     printf("Test 1\n");
     printf("Test 2\n");
     foo(3);
     foo(4);
     return 0;
}

然后我们将foo.c 编译成为liba.so: gcc -shared -fPIC -g3 -o libfoo.so foo.c
下面编译主main函数:gcc -Wall -g3 -o main main.c -lfoo -L /tmp/libfoo.so

下面我们对这个main进行调试,我们在printf与foo上都打上断点,然后开始运行,调试

(gdb) disassemble
Dump of assembler code for function main:
   0x00000000004006e6 <+0>:	push   %rbp
   0x00000000004006e7 <+1>:	mov    %rsp,%rbp
=> 0x00000000004006ea <+4>:	mov    $0x4007a0,%edi
   0x00000000004006ef <+9>:	callq  0x4005b0 <puts@plt>
   0x00000000004006f4 <+14>:	mov    $0x4007a0,%edi
   0x00000000004006f9 <+19>:	callq  0x4005b0 <puts@plt>
   0x00000000004006fe <+24>:	callq  0x4005e0 <foo@plt>
   0x0000000000400703 <+29>:	callq  0x4005e0 <foo@plt>
   0x0000000000400708 <+34>:	mov    $0x0,%eax
   0x000000000040070d <+39>:	pop    %rbp
   0x000000000040070e <+40>:	retq
End of assembler dump.
...
(gdb) si
0x00000000004005b0 in puts@plt ()

这里我们进入了.plt 中寻找puts函数,查看0x601018中的值,我们发现地址0x004005b6,而0x004005b6正是jmpq的下一条指令,执行完跳如GOT表中查找函数绝对地址。这样做避免了GOT表表是否为真实值检查,如果为空那么寻址,否则直接调用。

(gdb) disassemble
Dump of assembler code for function puts@plt:
=> 0x00000000004005b0 <+0>:	jmpq   *0x200a62(%rip)        # 0x601018 <[email protected]>
   0x00000000004005b6 <+6>:	pushq  $0x0
   0x00000000004005bb <+11>:	jmpq   0x4005a0
End of assembler dump.
(gdb) x/32x 0x601018
0x601018 <[email protected]>:	0x004005b6	0x00000000	0x25e20610	0x0000003e
0x601028 <[email protected]>:	0x004005d6	0x00000000	0x004005e6	0x00000000
...
End of assembler dump.
(gdb) si
0x00000000004005a0 in ?? ()
(gdb)
0x00000000004005a6 in ?? ()
(gdb)
0x0000003e25615b70 in _dl_runtime_resolve () from /lib64/ld-linux-x86-64.so.2
(gdb) disassemble
Dump of assembler code for function _dl_runtime_resolve:
=> 0x0000003e25615b70 <+0>:	sub    $0x78,%rsp
   0x0000003e25615b74 <+4>:	mov    %rax,0x40(%rsp)
...
   0x0000003e25615b9c <+44>:	bndmov %bnd1,0x10(%rsp)
   0x0000003e25615ba2 <+50>:	bndmov %bnd2,0x20(%rsp)
   0x0000003e25615ba8 <+56>:	bndmov %bnd3,0x30(%rsp)
   0x0000003e25615bae <+62>:	mov    0x8i0(%rsp),%rsi
   0x0000003e25615bb6 <+70>:	mov    0x78(%rsp),%rd
   0x0000003e25615bbb <+75>:	callq  0x3e2560e990 <_dl_fixup>
...

这个_dl_runtime_resolve 来自于ld-linux-x86-64.so.2文件,然后在ld中调用_dl_fixup 将真实的puts函数地址填入GOT表中,当程序再次调入puts函数中时,直接jmpq跳转到0x25e6fa70地址执行。

(gdb) disassemble 
Dump of assembler code for function puts@plt:
=> 0x00000000004005b0 <+0>:	jmpq   *0x200a62(%rip)        # 0x601018 <[email protected]>
   0x00000000004005b6 <+6>:	pushq  $0x0
   0x00000000004005bb <+11>:	jmpq   0x4005a0
End of assembler dump.
(gdb) x/32 0x601018
0x601018 <[email protected]>:	0x25e6fa70	0x0000003e	0x25e20610	0x0000003e
0x601028 <[email protected]>:	0x004005d6	0x00000000	0x004005e6	0x00000000
(gdb) n
Single stepping until exit from function _dl_runtime_resolve,
which has no line number information.
0x0000003e25e6fa70 in puts () from /lib64/libc.so.6
...

下面来说明foo的执行:当代码第一次执行foo函数,进程查找GOT表,找不到该函数,这个时候跳转到PLT[0] 使用_dl_runtime_resolve查找foo函数的绝对地址,当找到该函数绝对地址后,进入foo函数执行,foo函数中存在printf () 函数,这个函数和之前main函数中的printf() 不同,重新使用_dl_runtime_resolve 查找libc中的puts函数,将其插入到GOT表中。

(gdb) disassemble
Dump of assembler code for function foo@plt:
   0x00000000004005e0 <+0>:	jmpq   *0x200a4a(%rip)        # 0x601030 <[email protected]>
=> 0x00000000004005e6 <+6>:	pushq  $0x3
   0x00000000004005eb <+11>:	jmpq   0x4005a0
End of assembler dump.
...
(gdb)
0x00007ffff7df85a0 in puts@plt () from libfoo.so
(gdb)
0x00007ffff7df85a6 in puts@plt () from libfoo.so
(gdb)
0x00007ffff7df85ab in puts@plt () from libfoo.so
(gdb)
0x00007ffff7df8590 in ?? () from libfoo.so
(gdb)
0x00007ffff7df8596 in ?? () from libfoo.so
(gdb)
0x0000003e25615b70 in _dl_runtime_resolve () from /lib64/ld-linux-x86-64.so.2

当再次使用libfoo.so 中的foo函数,直接跳转GOT执行即可,无需再次查找。

(gdb)
0x00007ffff7df86db	5	    printf(...);
(gdb)
0x00007ffff7df85a0 in puts@plt () from libfoo.so
(gdb)
0x0000003e25e6fa70 in puts () from /lib64/libc.so.6
...

总结:

ld-linux-x86-64.so.2 是一个动态链接库,负责查找程序所使用的函数绝对地址,并将其写入到GOT表中,以供后续调用。其中GOT[0]为空,GOT[1]和GOT[2]用于保存查找的绝对函数地址,GOT[1]保存的是一个地址,指向已经加载的共享库的链表地址;GOT[2]保存的是一个函数的地址,定义如下:GOT[2] = &_dl_runtime_resolve,这个函数的主要作用就是找到某个符号的地址,并把它写到与此符号相关的GOT项中,然后将控制转移到目标函数,而后面的GOT[3],GOT[4]…都是通过_dl_fixup 添加的。

289baeed-3f91-3651-b81b-159632d1cf45

参考:

http://www.lizhaozhong.info/archives/524
http://flint.cs.yale.edu/cs422/doc/ELF_Format.pdf
http://rickgray.me/2015/08/07/use-gdb-to-study-got-and-plt.html
http://blog.csdn.net/anzhsoft/article/details/18776111

在内核中对文件进行读写

September 28th, 2015

我们知道在用户态下,使用各种文件的系统调用即可对文件进行读写操作,open()、write()、read()等。这些调用最后都会通过内核的VFS模型,调用到设备驱动函数,这里我们可以简单看一下open()、write()、read()驱动函数接口:

static int xxx_open(struct inode *inode, struct file *file);
static int xxx_release(struct inode *inode, struct file *file);
static ssize_t xxx_read(struct file *filp, char __user *ubuf,
                                  size_t usize, loff_t *off);
static unsigned int xxx_poll(struct file *file, poll_table *wait);
static long xxx_ioctl(struct file *f, unsigned int cmd,
                                  unsigned long arg);
ssize_t xxx_write(struct file *filp, const char __user *ubuf,
                          size_t usize, loff_t *off)

实际上在内核驱动调用的函数传入的参数远比我们在用户态下看到的复杂的多,那么问题来了:如果在内核态下对文件进行读取?当然我们不能在内核中使用syscall了,这里我们有两种方式:1.将全部的驱动函数导出 2.使用VFS在内核态中的接口。

将全部的驱动函数导出的方式虽然可行,但是这样做等于将函数暴露在全局,不利于封装,不推荐使用这种方式。第二种是我们推荐的方式,内核为开发者提供了filp_open(),filp_close(),vfs_read(),vfs_write(),vfs_fsync()接口,我们只需要调用这些接口即可在内核态下对文件进行操作。

首先我们要包含头文件:

#include <linux/fs.h>
#include <asm/segment.h>
#include <asm/uaccess.h>
#include <linux/buffer_head.h>

当然了,很多时候我们在内核层下封装了这些接口,使其可以像用户态下open那般简单易用。不过我们要注意open的返回值不再是fd,而是struct file *类型的指针!而path就是路径,flag是读写权限。

struct file* file_open(const char* path, int flags, int rights) {
    struct file* filp = NULL;
    mm_segment_t oldfs;
    int err = 0;

    oldfs = get_fs();
    set_fs(get_ds());
    filp = filp_open(path, flags, rights);
    set_fs(oldfs);
    if(IS_ERR(filp)) {
        err = PTR_ERR(filp);
        return NULL;
    }
    return filp;
}

关闭一个文件:

void file_close(struct file* file) {
    filp_close(file, NULL);
}

读取文件的封装接口参数比较多,第一个参数是文件指针,第二个是偏移量,第三个是buffer,第四个是读取的大小。与用户态下的read()类似!

int file_read(struct file* file, unsigned long long offset, unsigned char* data, unsigned int size) {
    mm_segment_t oldfs;
    int ret;

    oldfs = get_fs();
    set_fs(get_ds());

    ret = vfs_read(file, data, size, &offset);

    set_fs(oldfs);
    return ret;
}   

写数据到文件中:

int file_write(struct file* file, unsigned long long offset, unsigned char* data, unsigned int size) {
    mm_segment_t oldfs;
    int ret;

    oldfs = get_fs();
    set_fs(get_ds());

    ret = vfs_write(file, data, size, &offset);

    set_fs(oldfs);
    return ret;
}

立即回写到磁盘,同步文件:

int file_sync(struct file* file) {
    vfs_fsync(file, 0);
    return 0;
}


http://stackoverflow.com/questions/1184274/how-to-read-write-files-within-a-linux-kernel-module
https://en.wikipedia.org/wiki/Virtual_file_system

字符驱动poll函数与select()函数的交互

September 25th, 2015

在字符驱动中,我们经常要实现poll()的功能,具体实现在注册到file_operations 的函数中,举个例子

static unsigned int xxx_poll(struct file *file, poll_table *wait)
{
         poll_wait(file, &mp_chrdev_wait, wait);
         if (rcu_access_index(mplog.next))
                 return POLLIN | POLLRDNORM;
 
         return 0;
}

我们必须在这个函数中返回POLLIN、POLLOUT等状态,从而我们可以在用户态下使用FD_ISSET()判断数据是否到来。而其中void poll_wait(struct file *filp, wait_queue_head_t *queue, poll_table *wait);它的作用就是把当前进程添加到wait参数指定的等待列表(poll_table)中。需要注意的是这个函数是不会引起阻塞的。

这里我们实现创建了一个mp_chrdev_wait的等待队列,它会把这个轮训进程放入一个等待队列中,然后这个进程会睡眠(表现在select()上就是阻塞)。当某个条件满足时,唤醒这个等待队列,也就是唤醒了轮训进程,也就是内核通知应用程序(应用程序的select函数会感知),这个时候mask返回值中有数据。然后就会接着select操作。所以我们要在恰当的位置wake_up_interruptible(&mp_chrdev_wait)

在用户空间中的代码,我们需要使用select()轮训在这个设备上:

          int register_fd, ret;
          fd_set rds;
  
          register_fd = open(CONFIG_PATH, O_RDWR);
          if (register_fd < 0)
                 err("opening of /dev/mplog");
 
          FD_ZERO(&rds);
          FD_SET(register_fd,&rds);
  
  
          while (1) {
                  /*
                   * Proceed with the rest of the daemon.
                  */
                 memset(temp, 0, MP_LOG_LEN * sizeof(struct mp));
  
 
                  ret = select(register_fd+1,&rds,NULL,NULL,NULL);
                  if(ret < 0 )
                  {
                          close(register_fd);
                          err("select error!");
                  }
                  if(FD_ISSET(register_fd,&rds))
                         read(register_fd, temp, MP_LOG_LEN * sizeof(struct mp));
 .... 
          }