Archive for the ‘Linux下C编程’ category

C/S模型下Server 中fork()的健壮性

October 30th, 2014

C/S模型下Server 下编程非常依赖fork()子进程去处理具体的业务逻辑。 每当accept()接收到一个TCP连接时,主服务器进程就fork一个子服务器进程。子服务器进程调用相应的函数,通过client_fd(连接套接字)对客户端发来的网络请求进程处理;由于客户端的请求已被子服务进程处理,那么主服务器进程就什么也不做,通过sockfd(监听套接字)继续循环等待新的网络请求。

..........
while (1) {
	sin_size = sizeof(struct sockaddr_in);
	if ((client_fd = accept(sockfd, (struct sockaddr *)&remote_addr, &sin_size)) == -1) {
		my_error("accept", errno, __LINE__);
		continue;
	}

	if ((pid = fork()) == 0) {
		close(sockfd);
		process_client_request(client_fd);
		close(client_fd);
		exit(0);
	} else if (pid > 0)
		close(client_fd);
	else
		my_error("fork", errno, __LINE__);
}

每个文件都有一个引用计数,该引用计数表示当前系统内的所有进程打开该文件描述符的个数。套接字是一种特殊的文件,当然也有引用计数。 当fork执行后,由于子进程复制了父进程的资源,所以子进程也拥有这两个套接字描述符,则此时sockfd和client_fd的引用计数都为2。只有当子进程处理完客户请求时,client_fd的引用计数才由于close函数而变为0。 但是这里存在一个严重的问题:如果客户端意外退出,就会导致server子进程成为僵尸进程。我们设想如果server非常繁忙,就会导致system出现大量的zombie进程!system会应该耗尽系统资源而宕机! 这是因为

当一个子进程先于父进程结束运行时,它与其父进程之间的关联还会保持到父进程也正常地结束运行,或者父进程调用了wait才告终止。

子进程退出时,内核将子进程置为僵尸状态,它只保留最小的一些内核数据结构,以便父进程查询子进程的退出状态。

进程表中代表子进程的数据项是不会立刻释放的,虽然不再活跃了,可子进程还停留在系统里,因为它的退出码还需要保存起来以备父进程中后续的wait调用使用。

所以我们要处理zombie进程! 两种方式:

  • 调用wait或者waitpid函数查询子进程退出状态,此方法父进程会被挂起。
  • 如果不想让父进程挂起,可以在父进程中加入一条语句:signal(SIGCHLD,SIG_IGN);表示父进程忽略SIGCHLD信号,该信号是子进程退出的时候向父进程发送的。

当子进程终止时会给父进程发送SIGCHLD信号,因此我们可以利用信号处理函数捕获这个信号并对僵死进程进行处理。我们知道在父进程中调用wait函数可以防止先于父进程终止的子进程编程僵死进程

void sig_zchild(int signo)
{
	pid_t pid;
	int stat;

	pid = wait(&stat);
        printf("child %d terminated\n", pid);
	return;
}

修改服务器程序,在accept函数调用之前调用signal函数:

	if(listen(sockfd, BACKLOG) == -1) {

		printf("listen error!\n");
		exit(1);
	}

	if (signal(SIGCHLD, sig_zchild) == SIG_ERR) {
		printf("signal error!\n");
		exit(1);
	}

	while (1) {

		sin_size = sizeof(struct sockaddr_in);
		if ((client_fd = accept(sockfd, (struct sockaddr *)&remote_addr,
&sin_size)) == -1) {

			printf("accept error!\n");
			continue;
		}
		…… ……
	}//while

但是这个程序仍存在一个问题:当多个子进程同时退出时,会导致父进程无法同时处理SIGCHILD信号,导致有部分子进程zombie。

void sig_zchild(int signo)
{
 pid_t pid;
 int stat;

 while ((pid = waitpid(-1, &stat, WNOHANG)) > 0)
 printf("child %d terminated\n", pid);

 return;
}

使用while可以等待SIGCHILD信号,直到处理完成! 信号在内核中也是存放在队列中!


参考:http://www.cnblogs.com/mickole/p/3187770.html

具有健壮性的文件IO函数

October 13th, 2014

在理想环境下,我们使用linux下的read()write()函数可以依照我们想读的字节数读到buffer中。并没有考虑函数返回值的问题。

以read为例

static ssize_t rio_read(rio_t *rp, char *usrbuf, size_t n)
{
    int cnt;

    while (rp->rio_cnt <= 0) {  /* refill if buf is empty */
	rp->rio_cnt = read(rp->rio_fd, rp->rio_buf, 
			   sizeof(rp->rio_buf));
	if (rp->rio_cnt < 0) {
	    if (errno != EINTR) /* interrupted by sig handler return */
		return -1;
	}
	else if (rp->rio_cnt == 0)  /* EOF */
	    return 0;
	else 
	    rp->rio_bufptr = rp->rio_buf; /* reset buffer ptr */
    }

    /* Copy min(n, rp->rio_cnt) bytes from internal buf to user buf */
    cnt = n;          
    if (rp->rio_cnt < n)   
	cnt = rp->rio_cnt;
    memcpy(usrbuf, rp->rio_bufptr, cnt);
    rp->rio_bufptr += cnt;
    rp->rio_cnt -= cnt;
    return cnt;
}
ssize_t rio_readn(int fd, void *usrbuf, size_t n) 
{
 size_t nleft = n;
 ssize_t nread;
 char *bufp = usrbuf;

 while (nleft > 0) {
 if ((nread = read(fd, bufp, nleft)) < 0) {
 if (errno == EINTR) /* interrupted by sig handler return */
 nread = 0; /* and call read() again */
 else
 return -1; /* errno set by read() */ 
 } 
 else if (nread == 0)
 break; /* EOF */
 nleft -= nread;
 bufp += nread;
 }
 return (n - nleft); /* return >= 0 */
}

我们看到read返回值是有可能小于要求sizoof(buffer)的值,这种现象在kernel character device与network中非常普遍!

另外,read()应该也要处理用户发来的信号,如果遇到sigal信号,要使得返回值置0,并使得buffer指针的移动。

所以我们要注意,并进行比较。

比如在http://www.lizhaozhong.info/archives/1066中read也是实现了类似的思想。

维护一个len与count的关系,每次调用read函数都是确保len减去一个count大小的buffer,直到len<count,然后len赋值为count。

write函数也是类似,只不过len与count之间主要做加法。


copy() 与mmap()使用

September 18th, 2014

之前学了Linux内存管理,知道了内存的虚实地址转换,Linux内存映射这一块有很多应用可以极大的提高文件读写速度,其中提高的方式就是使用mmap的方式,而不是read write的方式。

我们要知道read write的方式需要事先分配一个buffer缓冲区。但是缓冲区非常有讲究,如果分配的过小就意味着os频繁的分配释放,效率比较低。如果buffer分配过大,又会很浪费内存。这也就是mmap()的优势,不仅没有浪费内存,而且速度相当的快。 » Read more: copy() 与mmap()使用

wait.h解析与应用

September 11th, 2014

list_head结构那样,等待队列(wait queue)作为linux内核中的基础数据结构,与进程调度紧密结合在一起;在驱动程序中,常常使用等待队列来实现进程的阻塞和进程的唤醒。 数据结构 一般我们的链式线性表都会有一个头结点,以使我们迅速找到这个线性链表的“领导”。在等待队列中,同样有队列头,只不过等待队列头和普通的等待队列结点定义有所不同。

include/linux/wait.h
struct __wait_queue_head {
 spinlock_t lock;
 struct list_head task_list;
};
typedef struct __wait_queue_head wait_queue_head_t;

可以看到,等待队列头结构中封装了list_head结构。这么做是可以想象到的,因为队列和栈本质上还是双联表。当我们适当限制双联表的某些操作时,就可以实现这样的功能。另外,等待队列头结构中还有一个自旋锁结构的变量lock,它起到了对等待队列进行互斥操作的作用。 在等待队列结构中,除了使用list_head结构外,还有以下几个字段:

typedef struct __wait_queue wait_queue_t;
struct __wait_queue {
unsigned int flags;
#define WQ_FLAG_EXCLUSIVE 0x01
void *private;
wait_queue_func_t func;
struct list_head task_list;
};

flag:指明该等待的进程是互斥还是非互斥,为0时非互斥,为1时互斥; WQ_FLAG_EXCLUSIVE :从变量可以看出,此宏代表进程是互斥的; private:void型指针变量功能强大,你可以赋给它你需要的结构体指针。一般赋值为task_struct类型的指针,也就是说指向一个进程; func:函数指针,指向该等待队列项的唤醒函数; 我们可以通过下述图来详细了解等待队列头和等待队列的结构关系: 5850668_1   
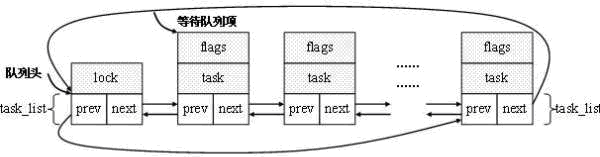
1.定义及初始化 对于结构的初始化 内核中使用init_waitqueue_head宏来初始化等待队列头。

include/linux/wait.h
#define init_waitqueue_head(q)                          \
        do {                                            \
                static struct lock_class_key __key;     \
                                                        \
                __init_waitqueue_head((q), &__key);     \
        } while (0)

事实上,这个do-while循环语句只会执行一次。那么,为什么要选择使用这个循环语句?在定义宏的时候将上述语句嵌套在一个大括号里也可以啊!可能我们如下那样使用一个宏:

         if(conditon)
             init_waitqueue_head(q);
         else
             do_somthing_else();

如果我们去除do-while,那么替换后会编译错误。 在init_waitqueue_head宏中调用的__init_waitqueue_head函数定义如下:

void __init_waitqueue_head(wait_queue_head_t *q, struct lock_class_key *key)
{
        spin_lock_init(&q->lock);
        lockdep_set_class(&q->lock, key);
        INIT_LIST_HEAD(&q->task_list);
}

在这个函数中,首先利用自旋锁初始化函数初始化这个自旋锁;在上述等待队列头的定义中,我们可以看到task_list字段是一个list_head结构类型,因此我们使用INIT_LIST_HEAD对这个链表进行初始化。这些过程都是我们所熟悉的。 对于初始化的一些函数与宏,我们可以查看代码即可。包括添加/移除等待队列 例如:add_wait_queue添加函数将等待队列wait添加到以q为等待队列头的那个等待队列链表中。

22void add_wait_queue(wait_queue_head_t *q, wait_queue_t *wait)
23{
24        unsigned long flags;
25
26        wait->flags &= ~WQ_FLAG_EXCLUSIVE;
27        spin_lock_irqsave(&q->lock, flags);
28        __add_wait_queue(q, wait);
29        spin_unlock_irqrestore(&q->lock, flags);
30}

我们可以看到flags的结果必然是0,也就是说这个函数是将非互斥进程添加到等待队列当中。而且在调用具体的添加函数时候,使用关中断并保护现场的自旋锁方式使得添加操作每次只被一个进程访问。 具体的添加过程是将当前进程所对应的等待队列结点wait添加到等待队列头结点q之后。具体来说,就是将new->task_list结点添加到以head->task_list为头指针的双链表当中。另外,通过add_wait_queue_exclusive函数可以将一个互斥进程添加到等待队列当中。从添加过程可以发现,add_wait_queue函数会将非互斥进程添加到等待队列的前部。

122static inline void __add_wait_queue(wait_queue_head_t *head, wait_queue_t *new)
123{
124        list_add(&new->task_list, &head->task_list);
125}

另外, add_wait_queue_exclusive添加函数则会将互斥进程添加到等待队列的末尾。

33void add_wait_queue_exclusive(wait_queue_head_t *q, wait_queue_t *wait)
34{
35        unsigned long flags;
36
37        wait->flags |= WQ_FLAG_EXCLUSIVE;
38        spin_lock_irqsave(&q->lock, flags);
39        __add_wait_queue_tail(q, wait);
40        spin_unlock_irqrestore(&q->lock, flags);
41}

remove_wait_queue函数用于将等待队列项wait从以q为等待队列头的等待队列中移除,源码如下。

44void remove_wait_queue(wait_queue_head_t *q, wait_queue_t *wait)
 45{
 46        unsigned long flags;
 47
 48        spin_lock_irqsave(&q->lock, flags);
 49        __remove_wait_queue(q, wait);
 50        spin_unlock_irqrestore(&q->lock, flags);
 51}

150static inline void __remove_wait_queue(wait_queue_head_t *head,
151                                                        wait_queue_t *old)
152{
153        list_del(&old->task_list);
154}

有了上述的基础,那么移除函数就简单了许多。

这里我们重点说一下在等待队列上睡眠

实现进程阻塞大致过程就是将当前进程的状态设置成睡眠状态,然后将这个进程加入到等待队列即可。在linux内核中有一组函数接口来实现这个功能。

4313void __sched interruptible_sleep_on(wait_queue_head_t *q)
4314{
4315        sleep_on_common(q, TASK_INTERRUPTIBLE, MAX_SCHEDULE_TIMEOUT);
4316}
4317EXPORT_SYMBOL(interruptible_sleep_on);
4318
4319long __sched
4320interruptible_sleep_on_timeout(wait_queue_head_t *q, long timeout)
4321{
4322        return sleep_on_common(q, TASK_INTERRUPTIBLE, timeout);
4323}
4324EXPORT_SYMBOL(interruptible_sleep_on_timeout);
4325
4326void __sched sleep_on(wait_queue_head_t *q)
4327{
4328        sleep_on_common(q, TASK_UNINTERRUPTIBLE, MAX_SCHEDULE_TIMEOUT);
4329}
4330EXPORT_SYMBOL(sleep_on);
4331
4332long __sched sleep_on_timeout(wait_queue_head_t *q, long timeout)
4333{
4334        return sleep_on_common(q, TASK_UNINTERRUPTIBLE, timeout);
4335}
4336EXPORT_SYMBOL(sleep_on_timeout);

通过上述源码,你可以发现这些函数在内部都调用了sleep_on_common函数,通过传递不同的值来实现不同的功能。而这个通用函数的三个参数分别关注的是:进程要加入到那个等待队列?进程是那种睡眠状态(TASK_UNINTERRUPTIBLE还是TASK_INTERRUPTIBLE)?进程睡眠的时间?

4292static long __sched
4293sleep_on_common(wait_queue_head_t *q, int state, long timeout)
4294{
4295        unsigned long flags;
4296        wait_queue_t wait;
4297
4298        init_waitqueue_entry(&wait, current);
4299
4300        __set_current_state(state);
4301
4302        spin_lock_irqsave(&q->lock, flags);
4303        __add_wait_queue(q, &wait);
4304        spin_unlock(&q->lock);
4305        timeout = schedule_timeout(timeout);
4306        spin_lock_irq(&q->lock);
4307        __remove_wait_queue(q, &wait);
4308        spin_unlock_irqrestore(&q->lock, flags);
4309
4310        return timeout;
4311}

在此函数中,首先定义了一个等待队列项结点,通过 init_waitqueue_entry函数对其进行初始化。可以从下述初始化源码中看到,此时该等待队列项指向当前当前进程。而唤醒函数指针func则指向内核自定义的一个默认唤醒函数default_wake_function。

 98static inline void init_waitqueue_entry(wait_queue_t *q, struct task_struct *p)
 99{
100        q->flags = 0;
101        q->private = p;
102        q->func = default_wake_function;
103}

初始化完毕后,通过__set_current_state函数将当前进程的状态设置成state。接着,在自旋锁的保护下,将当前进程对应的等待队列结点插入到等待队列链表当中。更重要的是,在schedule_timeout函数中不仅要设置进程的睡眠时间(以jiffies为单位的),还要使用schedule函数进行重新调度。一旦使用了schedule函数后,也就意味这当前这个进程真正的睡眠了,那么接下来的代码会在它唤醒后执行。当该进程被唤醒后(资源可用时),会从等待队列中将自己对应的那个等待队列结点wait移除。 上述过程都是在自旋锁保护下进行的,并且在整个执行过程中不可被其他中断所打断。现在再回过头去看一开始的那四个睡眠函数接口,你就明白了它们各自的不同之处了。

5.唤醒函数

唤醒函数会唤醒以x为头结点的等待队列中的等待队列项所对应的进程。与睡眠函数类似,内核中也有一组函数可以对阻塞的进程进行唤醒。

170#define wake_up(x)                      __wake_up(x, TASK_NORMAL, 1, NULL)
171#define wake_up_nr(x, nr)               __wake_up(x, TASK_NORMAL, nr, NULL)
172#define wake_up_all(x)                  __wake_up(x, TASK_NORMAL, 0, NULL)

175#define wake_up_interruptible(x)        __wake_up(x, TASK_INTERRUPTIBLE, 1, NULL)
176#define wake_up_interruptible_nr(x, nr) __wake_up(x, TASK_INTERRUPTIBLE, nr, NULL)
177#define wake_up_interruptible_all(x)    __wake_up(x, TASK_INTERRUPTIBLE, 0, NULL)

通过上述代码,我们可以发现这些唤醒函数均调用了__wake_up函数。__wake_up函数的四个参数分别指:头结点指针、唤醒进程的类型、唤醒进程的数量和一个附加的void型指针变量。

3999void __wake_up(wait_queue_head_t *q, unsigned int mode,
4000                        int nr_exclusive, void *key)
4001{
4002        unsigned long flags;
4003
4004        spin_lock_irqsave(&q->lock, flags);
4005        __wake_up_common(q, mode, nr_exclusive, 0, key);
4006        spin_unlock_irqrestore(&q->lock, flags);
4007}

在__wake_up函数又通过传递不同的参数调用__wake_up_common函数来实现不同的唤醒功能。

3975static void __wake_up_common(wait_queue_head_t *q, unsigned int mode,
3976                        int nr_exclusive, int wake_flags, void *key)
3977{
3978        wait_queue_t *curr, *next;
3979
3980        list_for_each_entry_safe(curr, next, &q->task_list, task_list) {
3981                unsigned flags = curr->flags;
3982
3983                if (curr->func(curr, mode, wake_flags, key) &&
3984                                (flags & WQ_FLAG_EXCLUSIVE) && !--nr_exclusive)
3985                        break;
3986        }
3987}

list_for_each_entry_safe函数将遍历整个等待队列中的链表,通过每次的逻辑判断来唤醒相应的进程。

这个if语句初看起来有点麻烦,不过我们一点一点的将它拆解。 curr->func(curr, mode, sync, key):即执行默认的唤醒函数,将指定的进程curr以mode方式唤醒。成功唤醒返回1;否则,返回0; (flags & WQ_FLAG_EXCLUSIVE):判断当前进程是否以互斥形式唤醒。

是互斥形式则返回1;否则返回0; !–nr_exclusive:nr_exclusive为需要唤醒的互斥进程的数量。 这三个部分是通过逻辑与连接起来的。根据逻辑与的运算规则,只有当第一部分为真时才会判断第二部分的值,依次再判断第三部分的值。 通过上述的等待队列的添加过程我们知道,

等待队列中前面均是非互斥进程,后面才是互斥进程。因此,唤醒函数总先唤醒全部的非互斥进程。因为当__wake_up_commom函数每一次去判断if语时,总会“不自觉”去执行默认的唤醒函数(除非唤醒失败,那么会退出遍历宏);当全部的非互斥进程被唤醒后,第二个判断条件也就成立了。因此__wake_up_commom函数会依次唤醒nr_exclusive个互斥进程;当–nr_exclusive为0时(!–nr_exclusive也就为真),整个遍历过程也恰好结束,而此时if语句的三个判断条件才刚好满足(这段代码太强大了!!!)。

关于条件睡眠,虽然函数实现与睡眠函数不同,但是基本思想是相似的,可以查找相应的源码进行分析。

list 实际应用

September 3rd, 2014

一个head头包含两个不同的链表,每个链表会有交叉,在高级的场景下使用,例如多cgroup 与多css_set关系!

#include "list.h"
#define MAX_LEN 256

struct task_struct{
	list_head priority_list;
	list_head timer_list;
	int priority;
	int timeout;
	char name[MAX_LEN];
};

struct task_struct* init_task(int priority,int timeout,char *name,int str_len)
{
	struct task_struct *T = (struct task_struct * )malloc(sizeof(struct task_struct));
	T->priority = priority;
	T->timeout = timeout;
	strncpy(T->name,name,str_len);
	return T;

}

struct list_head* p_add_task(list_head *head,struct task_struct *task)
{
	struct list_head *pos;
	struct task_struct *p;
	if(list_empty(head))
	{
		list_add(&task->priority_list,head);
		return head;
	}
	list_for_each(pos,head)//big->little
	{
		p=list_entry(pos, struct task_struct, priority_list);
		if( p->priority  < task->priority)//insert node > current node
		{
			list_add(&task->priority_list,pos->prev);
			return head;
		}
	}
	list_add_tail(&task->priority_list,head);
	return head;
}
struct list_head* t_add_task(list_head *head,struct task_struct *task)
{
	struct list_head *pos;
	struct task_struct *p;
	if(list_empty(head))
	{
		list_add(&task->timer_list,head);
		return head;
	}
	list_for_each(pos,head)//little ->big
	{
		p=list_entry(pos, struct task_struct, timer_list);
		if( p->timeout  > task->timeout)//insert node > current node
		{
			list_add(&task->timer_list,pos->prev);
			return head;
		}
	}
	list_add_tail(&task->timer_list,head);
	return head;
}

struct task_struct* p_del_task(list_head *head,struct task_struct *task)
{
	list_del(&task->priority_list);
	return task;
}
struct task_struct* t_del_task(list_head *head,struct task_struct *task)
{
	list_del(&task->timer_list);
	return task;
}

int Print_priority_list(struct task_struct *task)
{
	struct list_head *pos;
	struct task_struct *p;
	printf("P\tT\tN\n");
	list_for_each(pos,&task->priority_list)
	{
		p=list_entry(pos, struct task_struct, priority_list);
		printf("%d\t%d\t%s\n", p->priority,p->timeout,p->name);
	}
}

int Print_timer_list(struct task_struct *task)
{
	struct list_head *pos;
	struct task_struct *p;
	printf("P\tT\tN\n");
	list_for_each(pos,&task->timer_list)
	{
		p=list_entry(pos, struct task_struct, timer_list);
		printf("%d\t%d\t%s\n", p->priority,p->timeout,p->name);
	}
}

int main()
{
	struct task_struct head={
		.priority_list = LIST_HEAD_INIT(head.priority_list),
		.timer_list = LIST_HEAD_INIT(head.timer_list),
 		.priority = -1,
		.timeout = -1,
		.name = NULL
	};

	char temp1[MAX_LEN] = "T1";
	char temp2[MAX_LEN] = "T2";
	char temp3[MAX_LEN] = "T3";
	struct task_struct *T1,*T2,*T3;
	T1 = init_task(1,10,temp1,strlen(temp1));
	T2 = init_task(3,5,temp2,strlen(temp2));
	T3 = init_task(2,2,temp3,strlen(temp3));
	
	p_add_task(&head.priority_list,T2);
	p_add_task(&head.priority_list,T3);
	p_add_task(&head.priority_list,T1);

	t_add_task(&head.timer_list,T3);
	t_add_task(&head.timer_list,T2);	
	t_add_task(&head.timer_list,T1);


	Print_priority_list(&head);
	printf("\n");
	Print_timer_list(&head);

	p_del_task(&head.priority_list,T2);
	p_del_task(&head.priority_list,T3);
	p_del_task(&head.priority_list,T1);

	t_del_task(&head.timer_list,T3);
	t_del_task(&head.timer_list,T2);
	t_del_task(&head.timer_list,T1);
	return 0;
}

http://www.lizhaozhong.info/archives/951